Introduction
Organizer for Jira is a Plugin App that arranges Jira issues into folder structures, which enables user to track projects, release, sprint, or resources in multi-dimensional views. It also allows user to manage Jira issues within the Organizer. You can create different type of organizers with different criteria to meet your agile development needs. For examples, you can use Organizer to track selected projects in your organization; you can also use Organizer to plan your resource distribution within a team. Organizer is a powerful tool that helps to bring your team on the same page and increase productivity.
Quick Start
Organizer for Jira is available on Atlassian Marketplace for trial or purchase. It is compatible to Jira Cloud. Ask your Jira administrator to install Organizer from Atlassian Marketplace.
Create Your First Jira Issue Organizer
- Login to your Jira account
- On the Jira Main Menu, click on "Organizer" to display Organizer dashboard
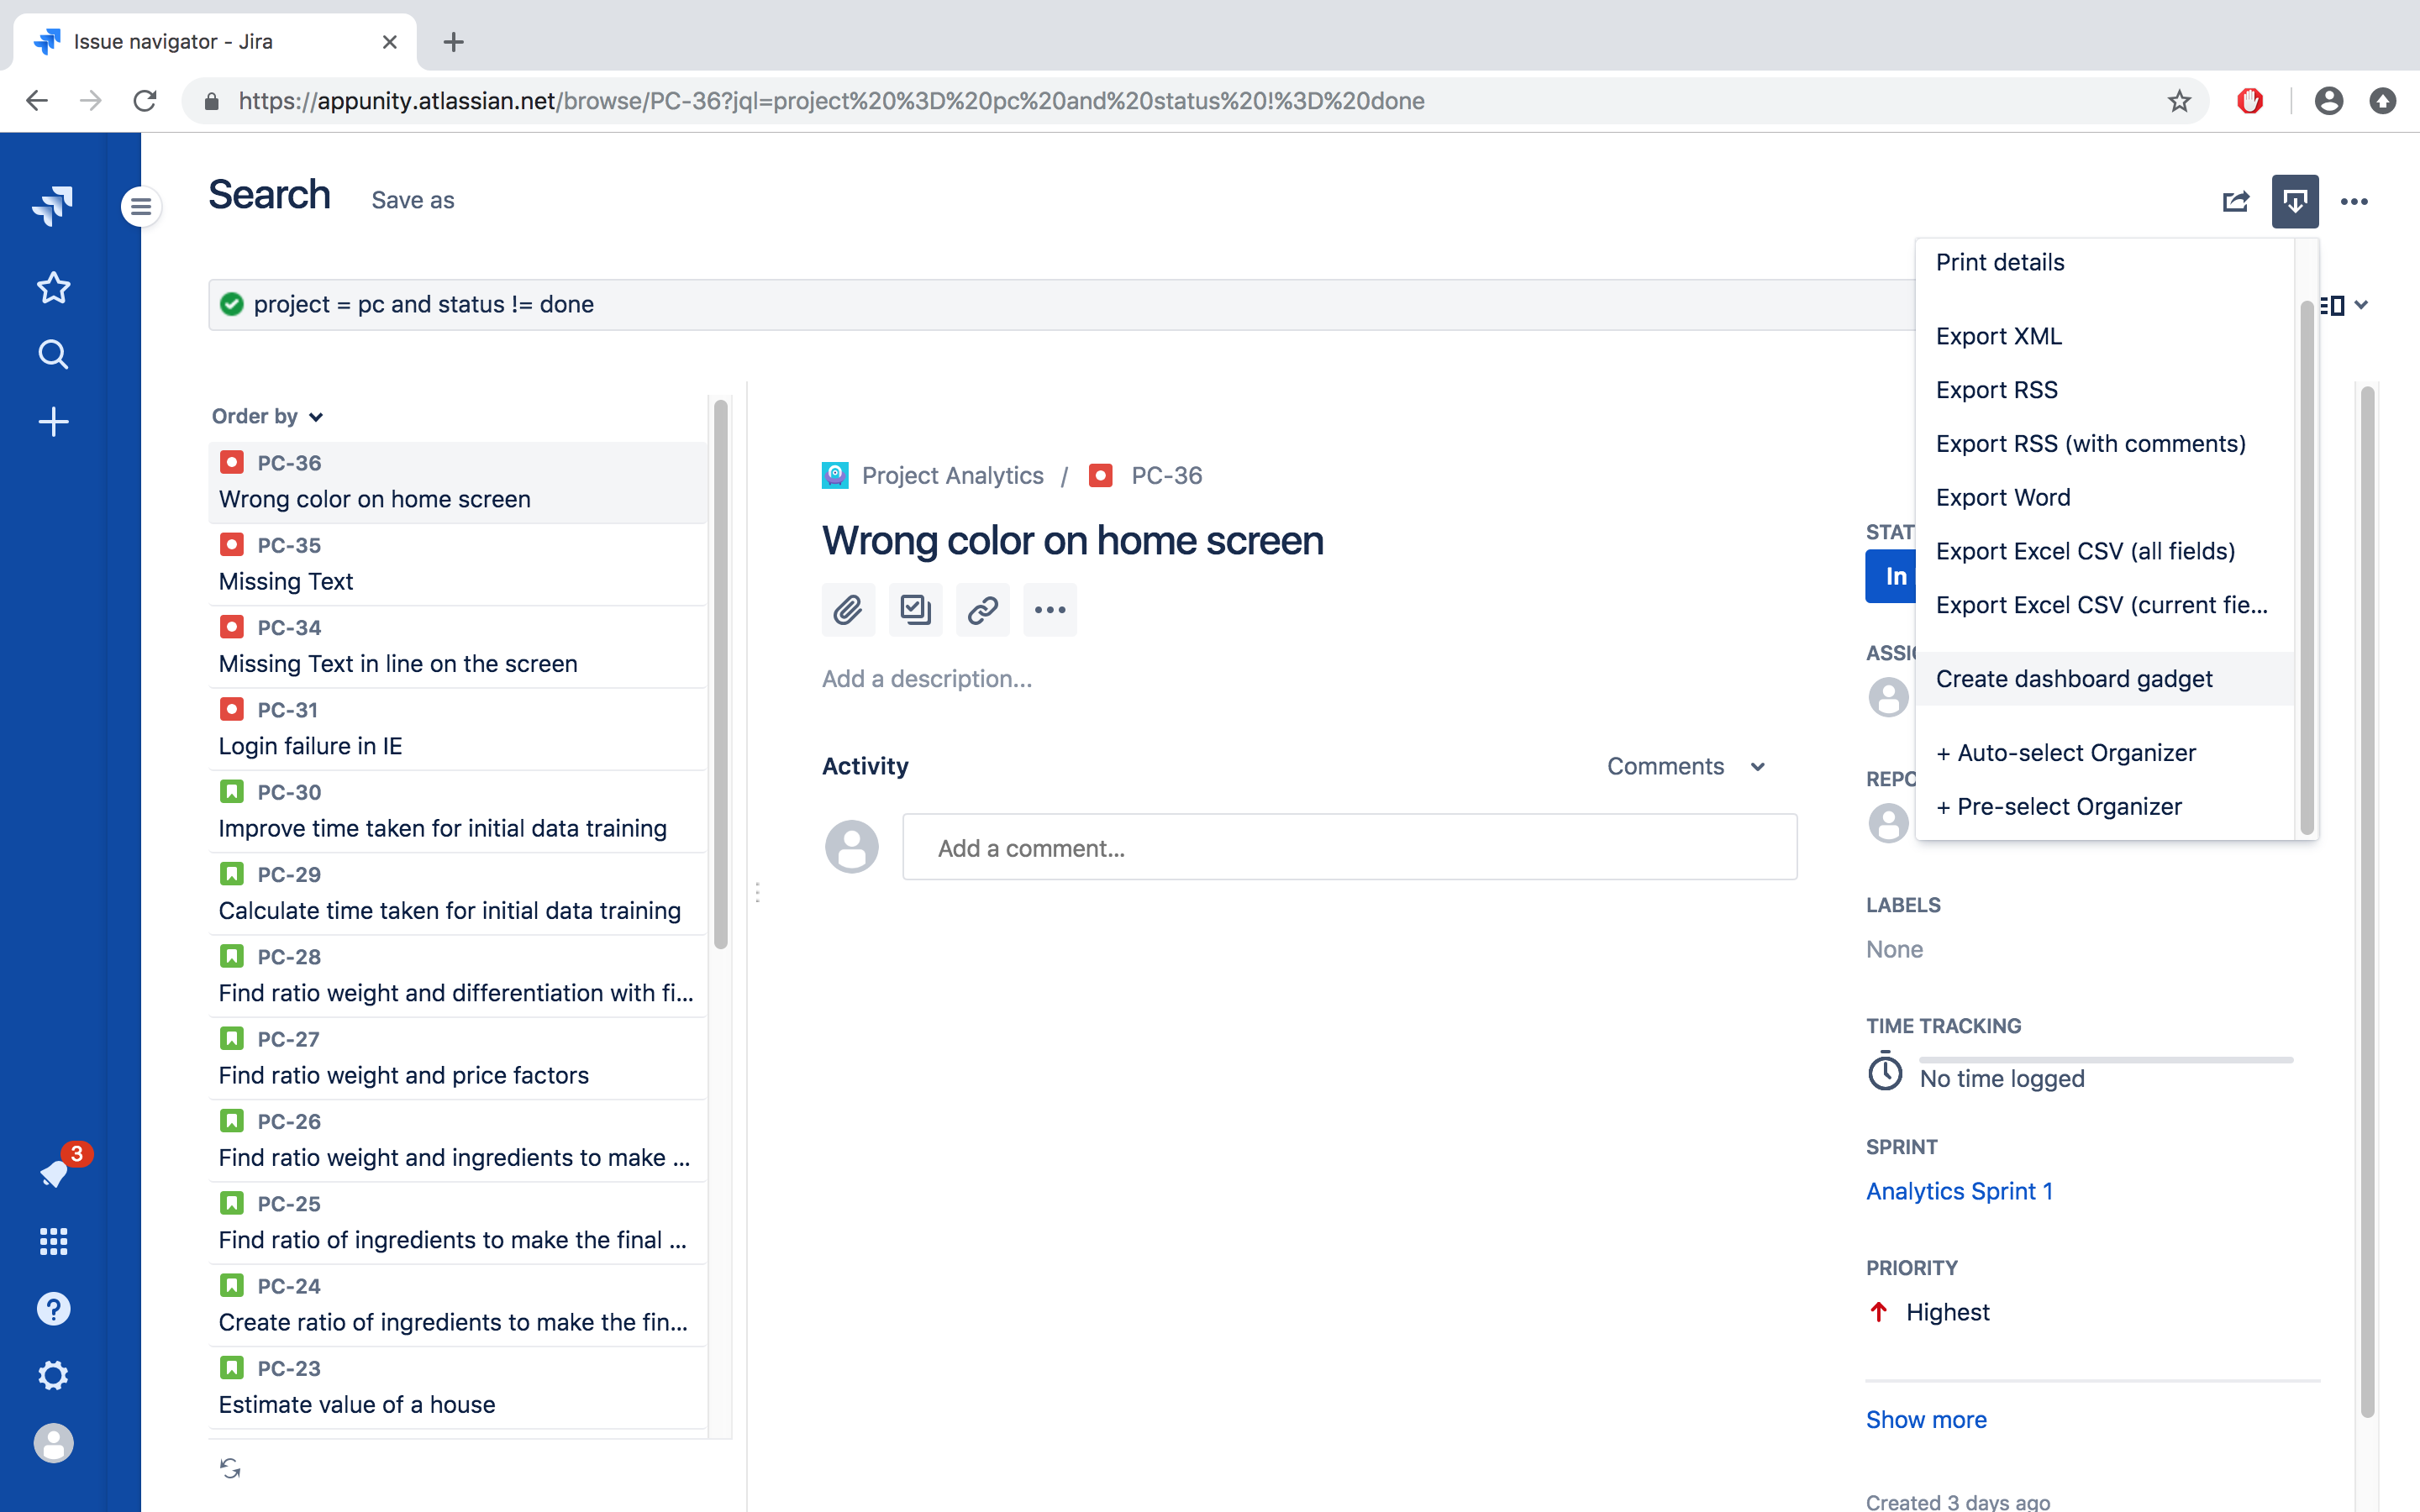
- Click "+ Auto-select Organizer" to bring up Create Organizer page
- Choose a Name and filling in the Description of the Organizer
- Type in or copy/paste the JQL for the Jira issues you want to include in this Organizer, and click the search icon. Alternatively, you can also select JQL from any existing Jira Filter
- Click the "+" icon to add folder levels. For each folder level, use the drop-down to select the Jira issue property
- Drag-drop the folder icons to reorder the folder levels if needed
- Examine the page and make updates. Click "Save" at the top of the page
Congratulations! You just created your first Jira Issue Organizer
Use Your Organizer
Now that you have your first Organizer, you can view and manage the Jira issues without leaving the Organizer View page
Get a Feeling
- Click through the folder tree structure to check the hierarchy levels
- Open or close the folders or sub-folders
- On the top of the folder structure, toggle the folder icons to enable or disable the folder levels
- On the top of the page, enable or disable progress tracking
- Toggle the Star icon to mark or unmark this Organizer as one of your favorites
- Try to Edit or Copy the Organizer
Manage Jira Issues
- In Organizer issue list table, try to click on the Jira issue fields, such Summary, Priority, Status, etc. Those field values can be updated on the spots
- Click "Refresh" button on the top of the page, and notice that some of the updated tickets may get moved to the different folders due to the field value changes
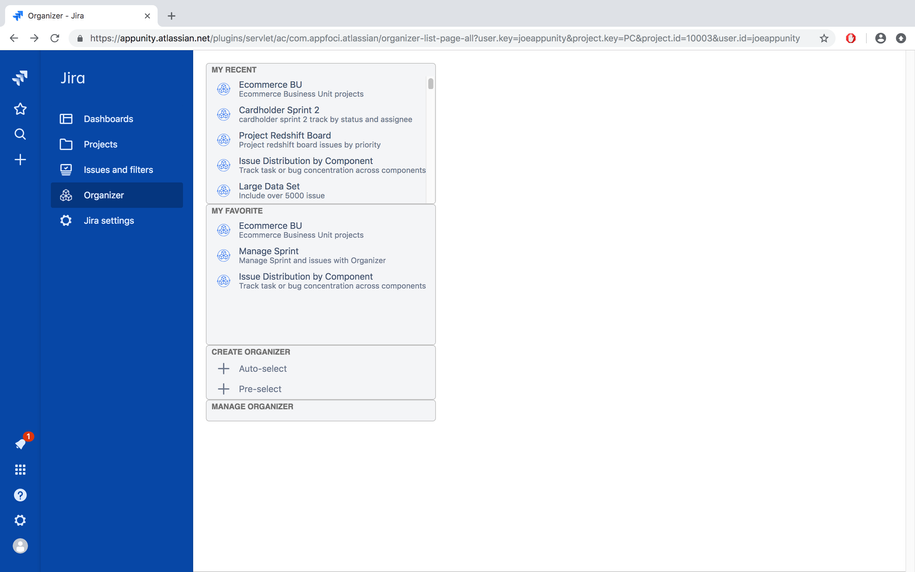
Organizer Dashboard
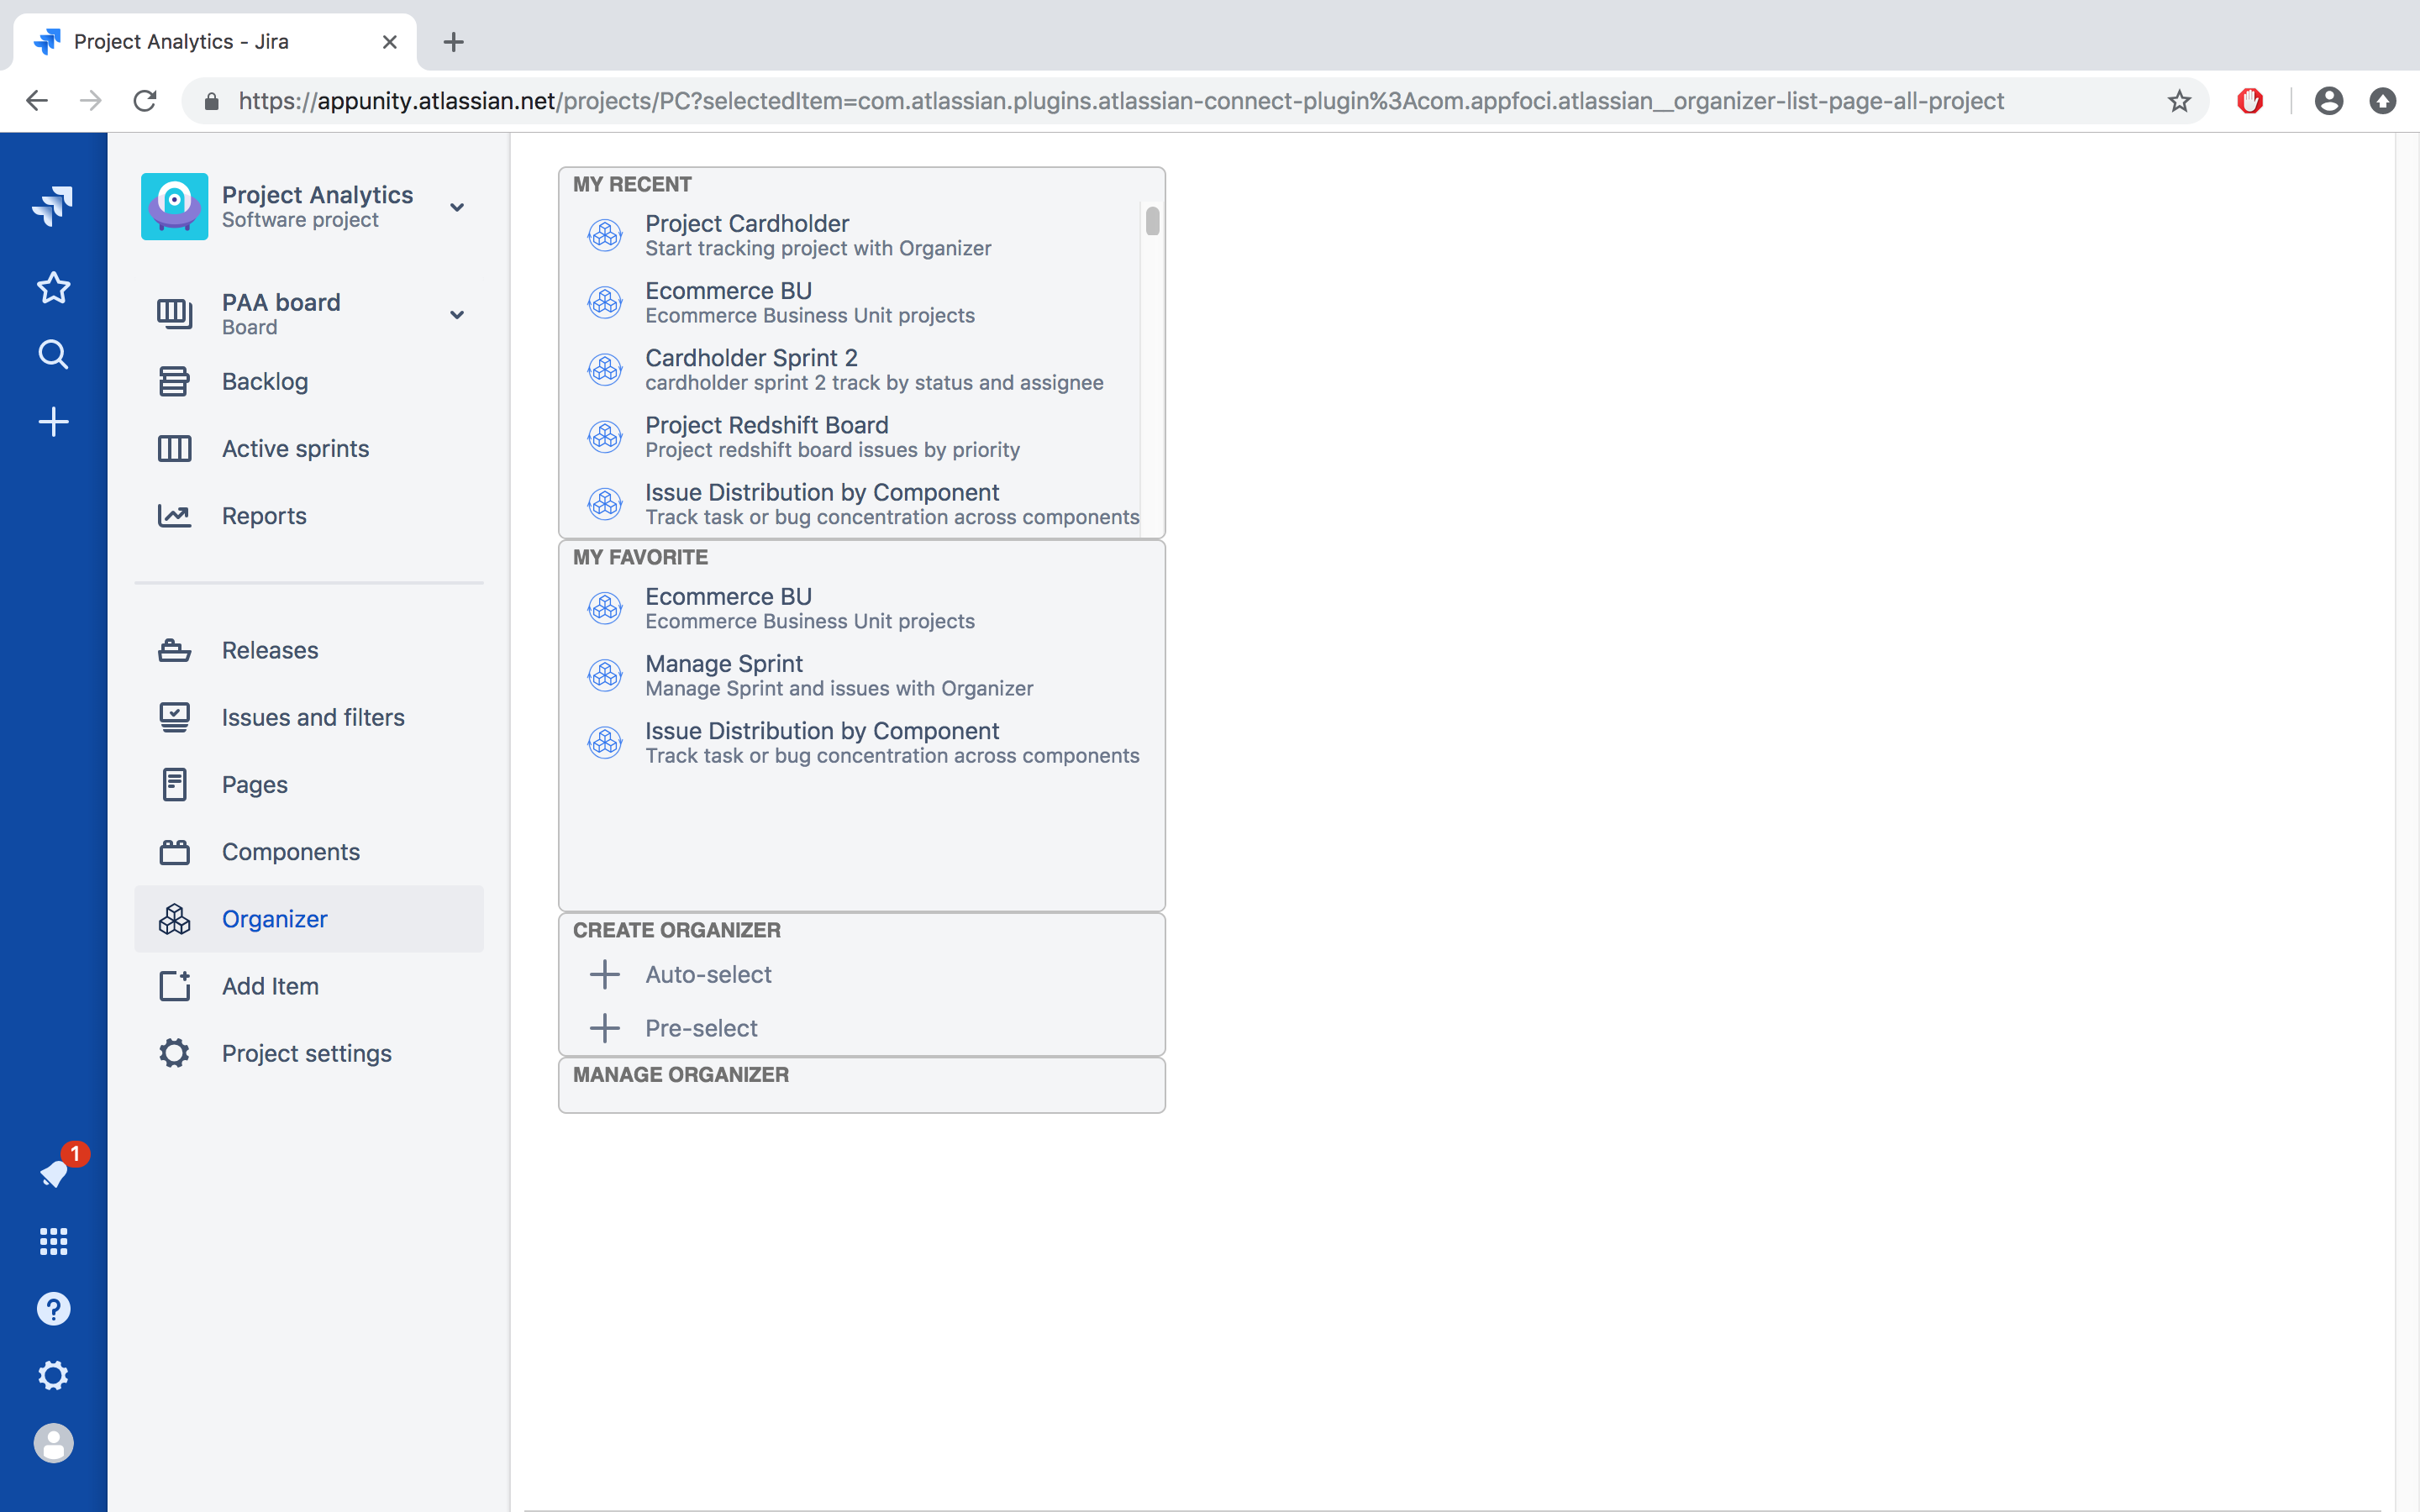
From Organizer Dashboard, you can view existing Organizers or create new Organizers. You may ccess the Dashboard from two entry points: Jira Main Menu or Jira Project View

The Organizer dashboard consist of 4 sections
- MY RECENT lists all the Organizers that you viewed before, ordered by the last access time with most recent first. The non-private Organizers that you never viewed before are also listed in this section
- MY FAVORITE lists those Organizers that you marked as favorite in alphabetical order
- CREATE ORGANIZER contains links to create Auto-select or Pre-select Organizers
- MANAGE ORGANIZER leads to Manage Organizer page
Create Organizer
There are two types of organizers: Auto-select Organizer and Pre-select Organizer
- Auto-select Organizer includes all the Jira issues that meet the JQL (Jira Query) criteria. It assesses the JQL when you go to the Organizer View page, or when you click the "Refresh" button on the View page.
- Pre-select Organizer includes the Jira issues added at the creation time. You can add or remove Jira issues by Editing the Organizer
Take one of the following approaches to start creating an Organizer
- On the Organizer dashboard, click "+ Auto-select Organizer" or "+ Pre-select Organizer"
- On the Manage Organizer page, click "+ Auto-select Organizer" or "+ Pre-select Organizer"
- On the Manage Organizer page, click "Import XLS" to create a Pre-select Organizer
- Make a copy of an existing Organizer and update from there: While viewing an Organizer, click "Copy"
- On the Jira issue search page, from the drop-down menu, click "+ Auto-select Organizer" or "+ Pre-select Organizer". The search JQL will be carried into the JQL field on the Create Organizer page
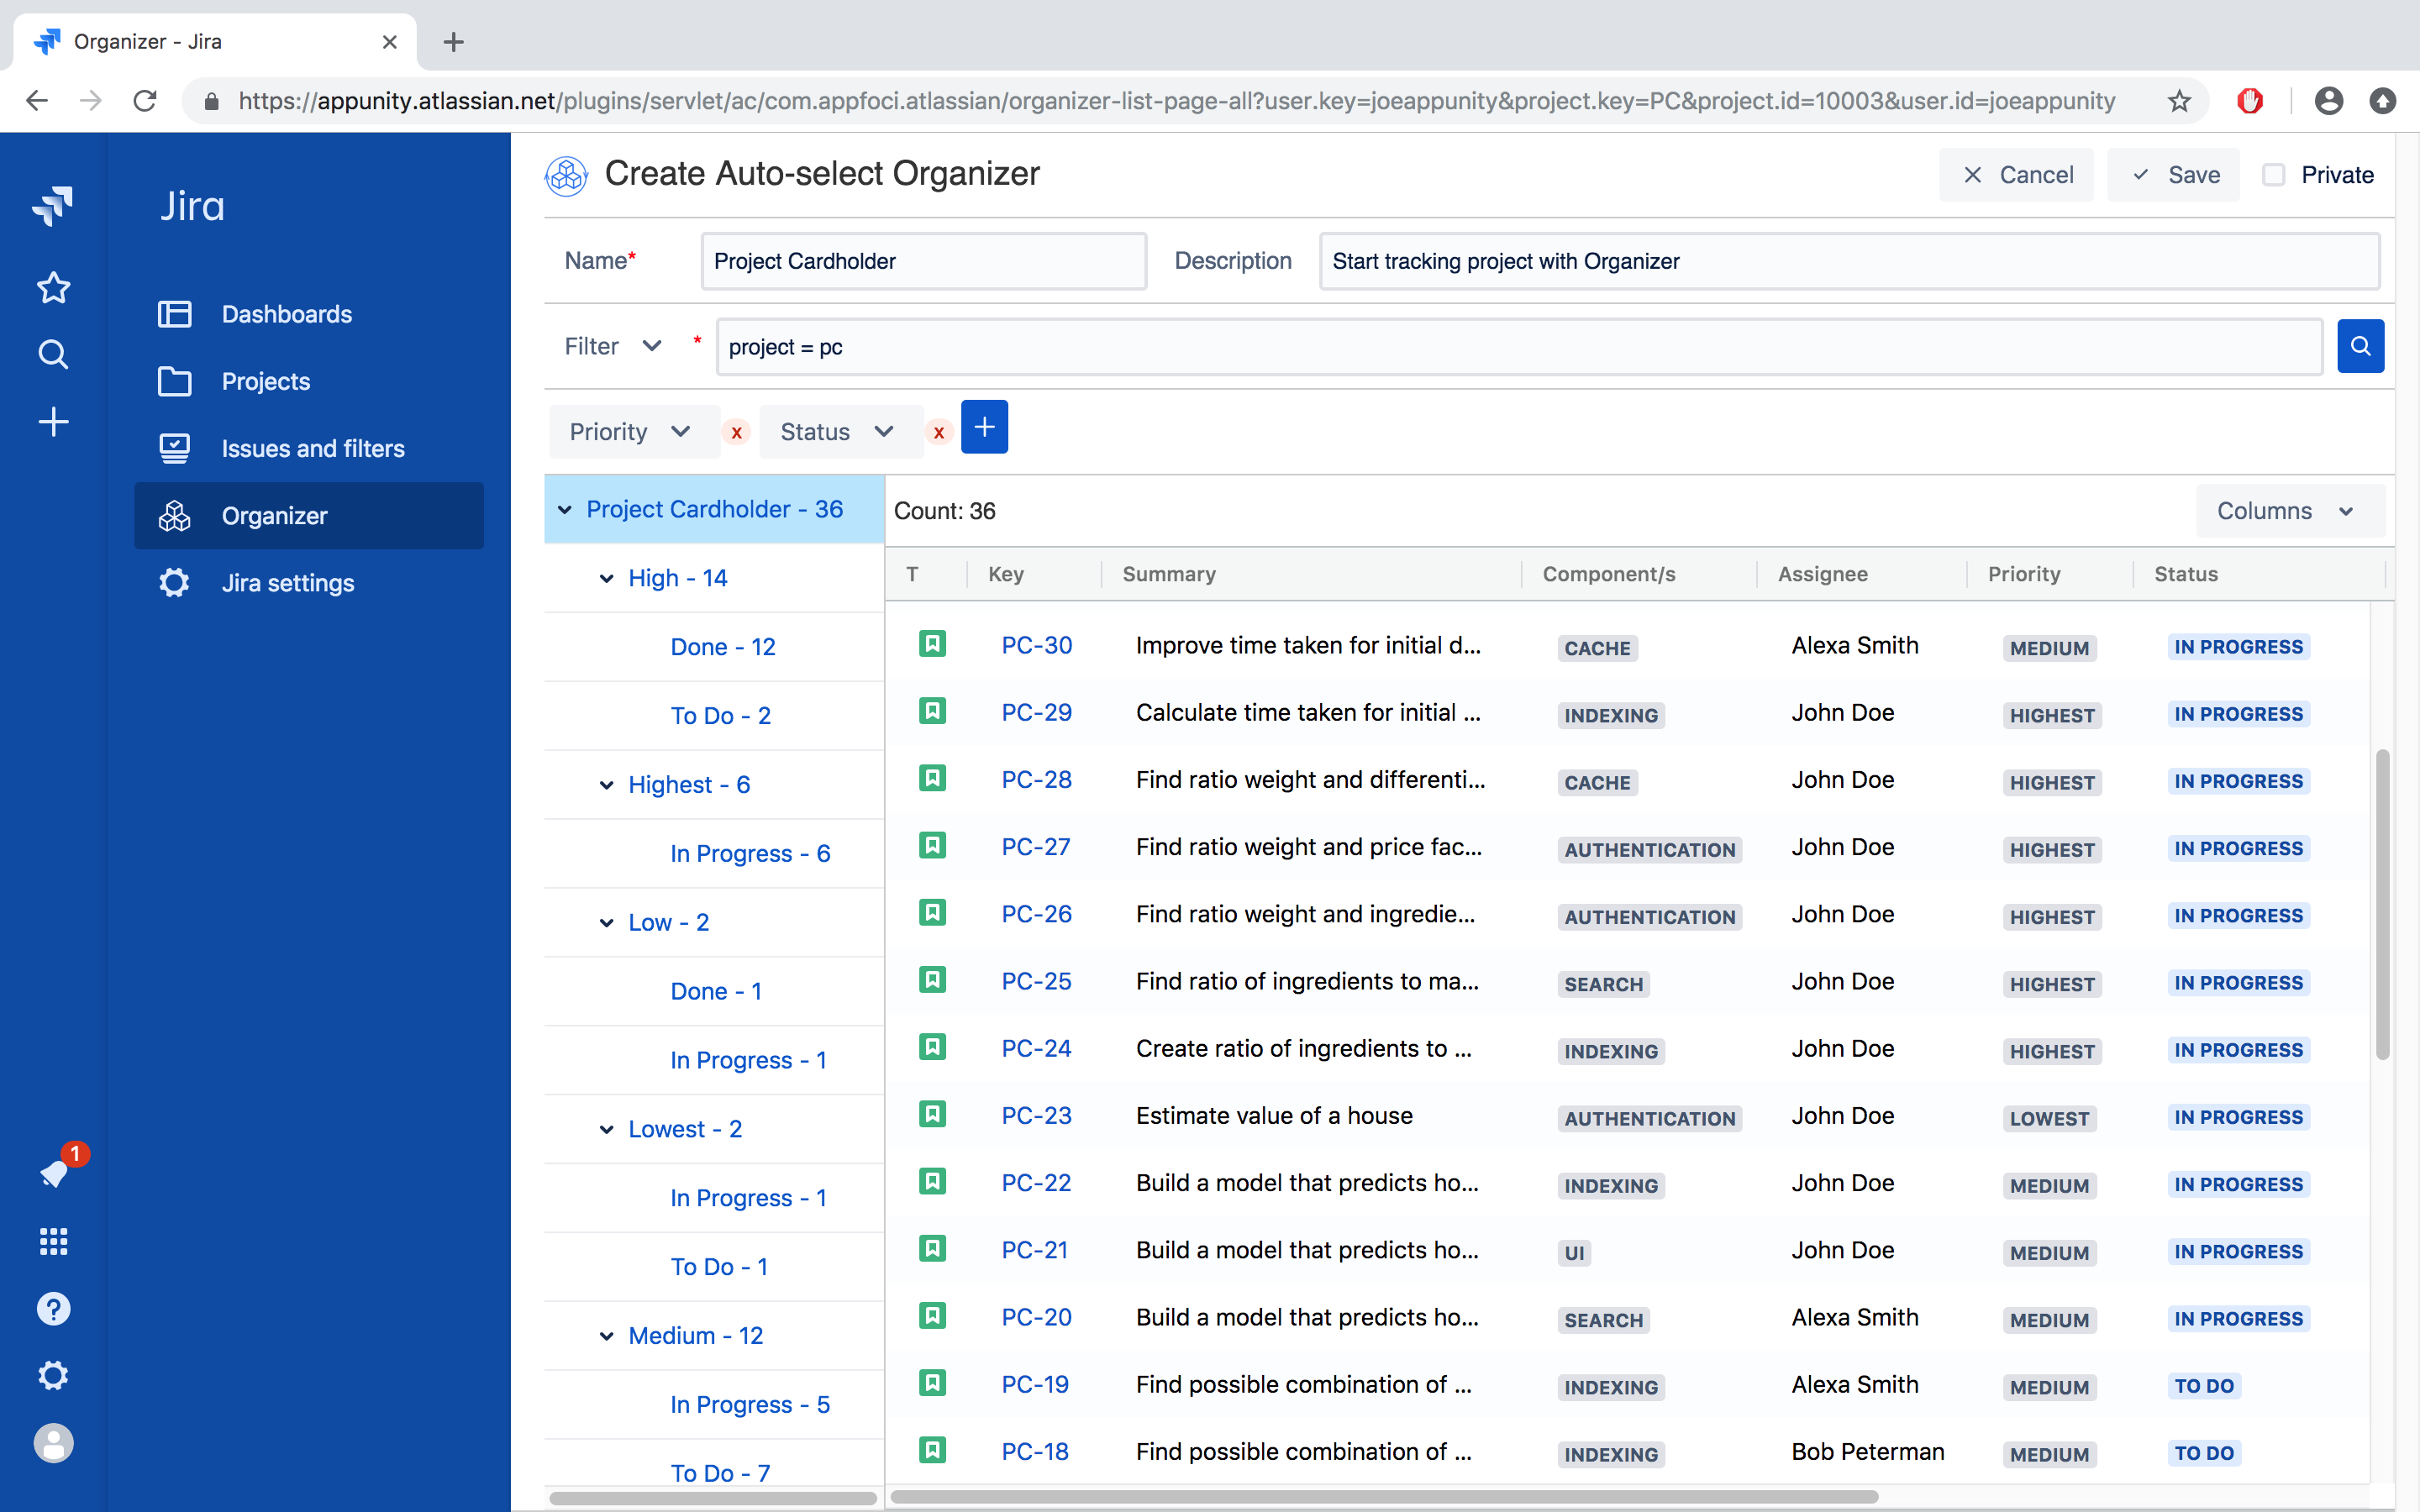
Create Auto-select Organizer
- Click "+ Auto-select Organizer" to bring up Create Auto-select Organizer page
...
Name your Organizer
...
Give a Description , which is optional
...
.
...
Click the Search icon to execute the JQL
...
Click the "+" icon to add folder levels. Use the drop-down to select the Jira issue property as the folder level
...
Drag-drop to reorder the folder levels
...
Click the “x” sign beside a folder level dropdown to delete a folder level
...
Examine the page and make update as needed
...
If you like to keep this Organizer to yourself, check the "Private" checkbox. Otherwise, any logged-in users will be able to view this Organizer
...
Click "Save" at the top of the page to save the Organizer.
...
Otherwise, click "Cancel" to discard the creation
Create Pre-select Organizer
- Click "+ Pre-select Organizer" to bring up Create Pre-select Organizer page
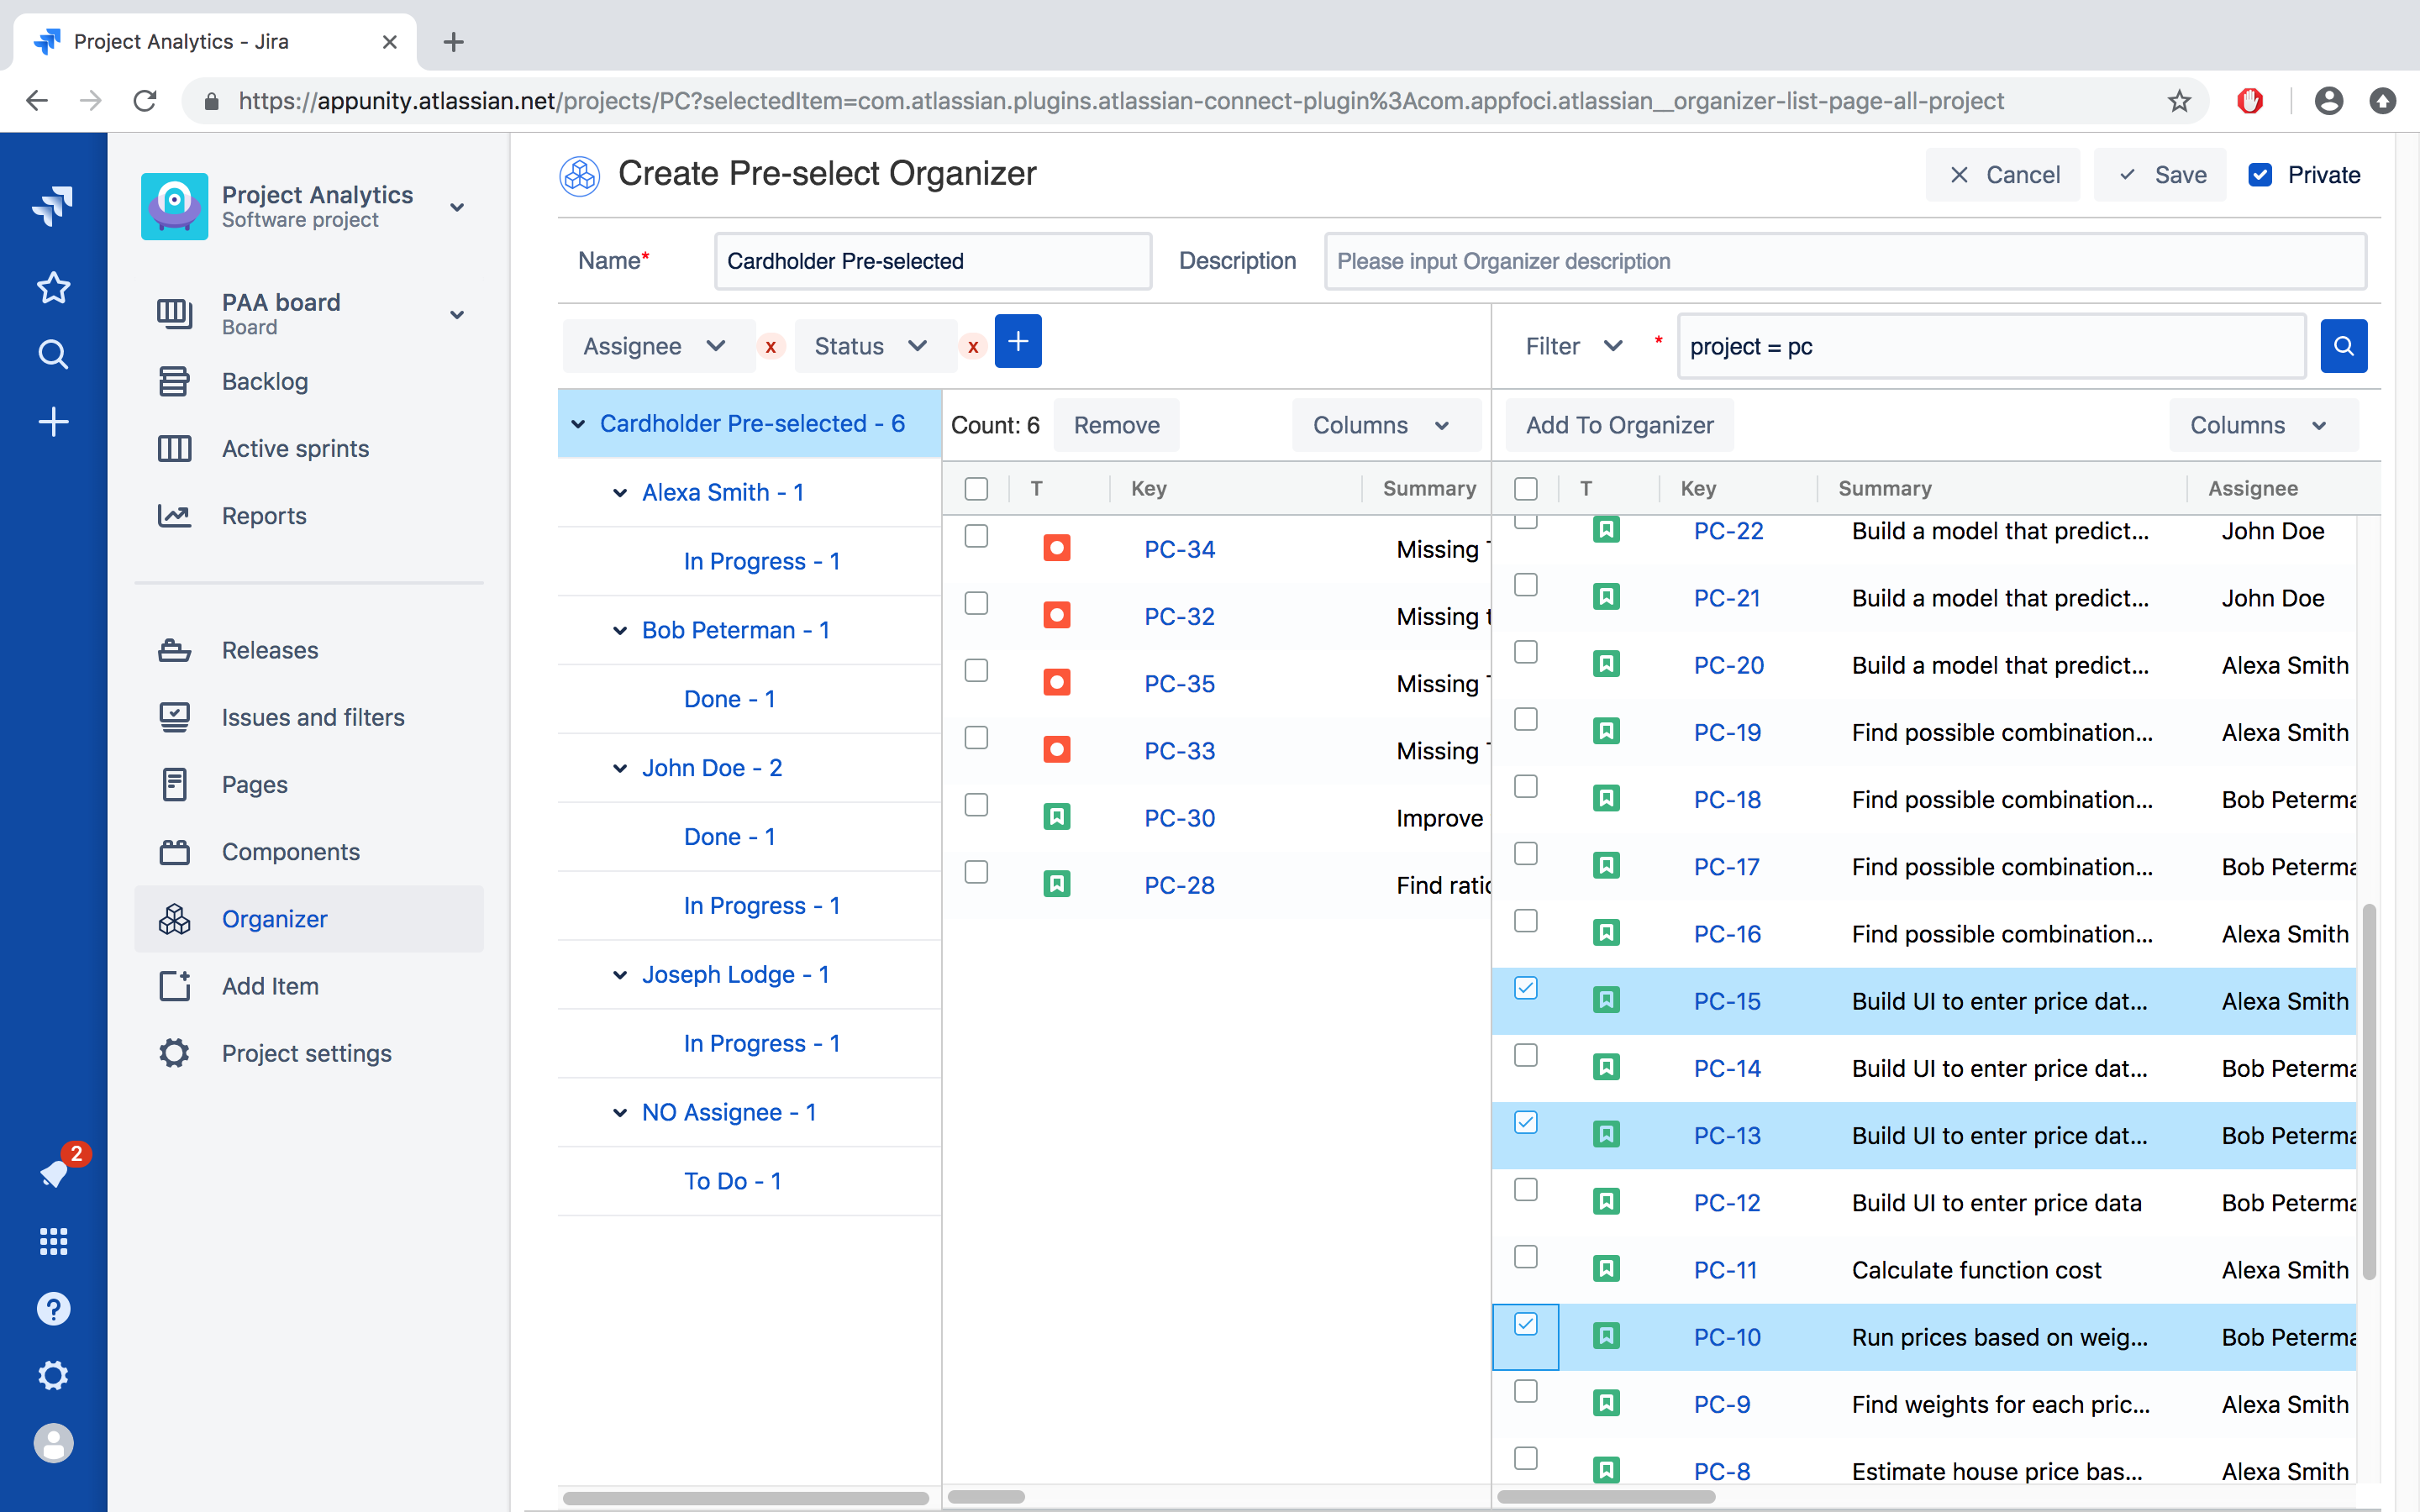
Name your Organizer
Give a Description , which is optional
In the search Issue panel, use JQL or filter to retrieve Jira issues as candidates. Click the Search icon to execute the JQL
Select the issues and click the "Add To Organizer." button
To remove issues from the Organizer, select the added issues and click Remove button
Click the "+" icon to add folder levels. Use the drop-down to select the Jira issue property as the folder level
Drag-drop to reorder the folder levels
Click the “x” sign beside a folder level dropdown to delete a folder level
Examine the page and make update as needed
Check the "Private" checkbox if you like to keep this Organizer to yourself
Click "Save" at the top of the page to save the Organizer.
Otherwise, click "Cancel" to discard the creation
View Organizer
There are three ways to access existing Organizers
From Organizer Dashboard
In the MY RECENT area, browse the Organizers that you accessed before and click the one you like to view
In the MY FAVORITE area, browse the Organizers that you marked ad favorite and click the one you like to view
The Manage Organizer page lists all the organizers that you created and your team members created by and made non-private. Click the one you like to view
You can also bookmark a View Organizer page for later access. If you choose to send the link to your team members to share an Organizer, remember to mark it as non-private
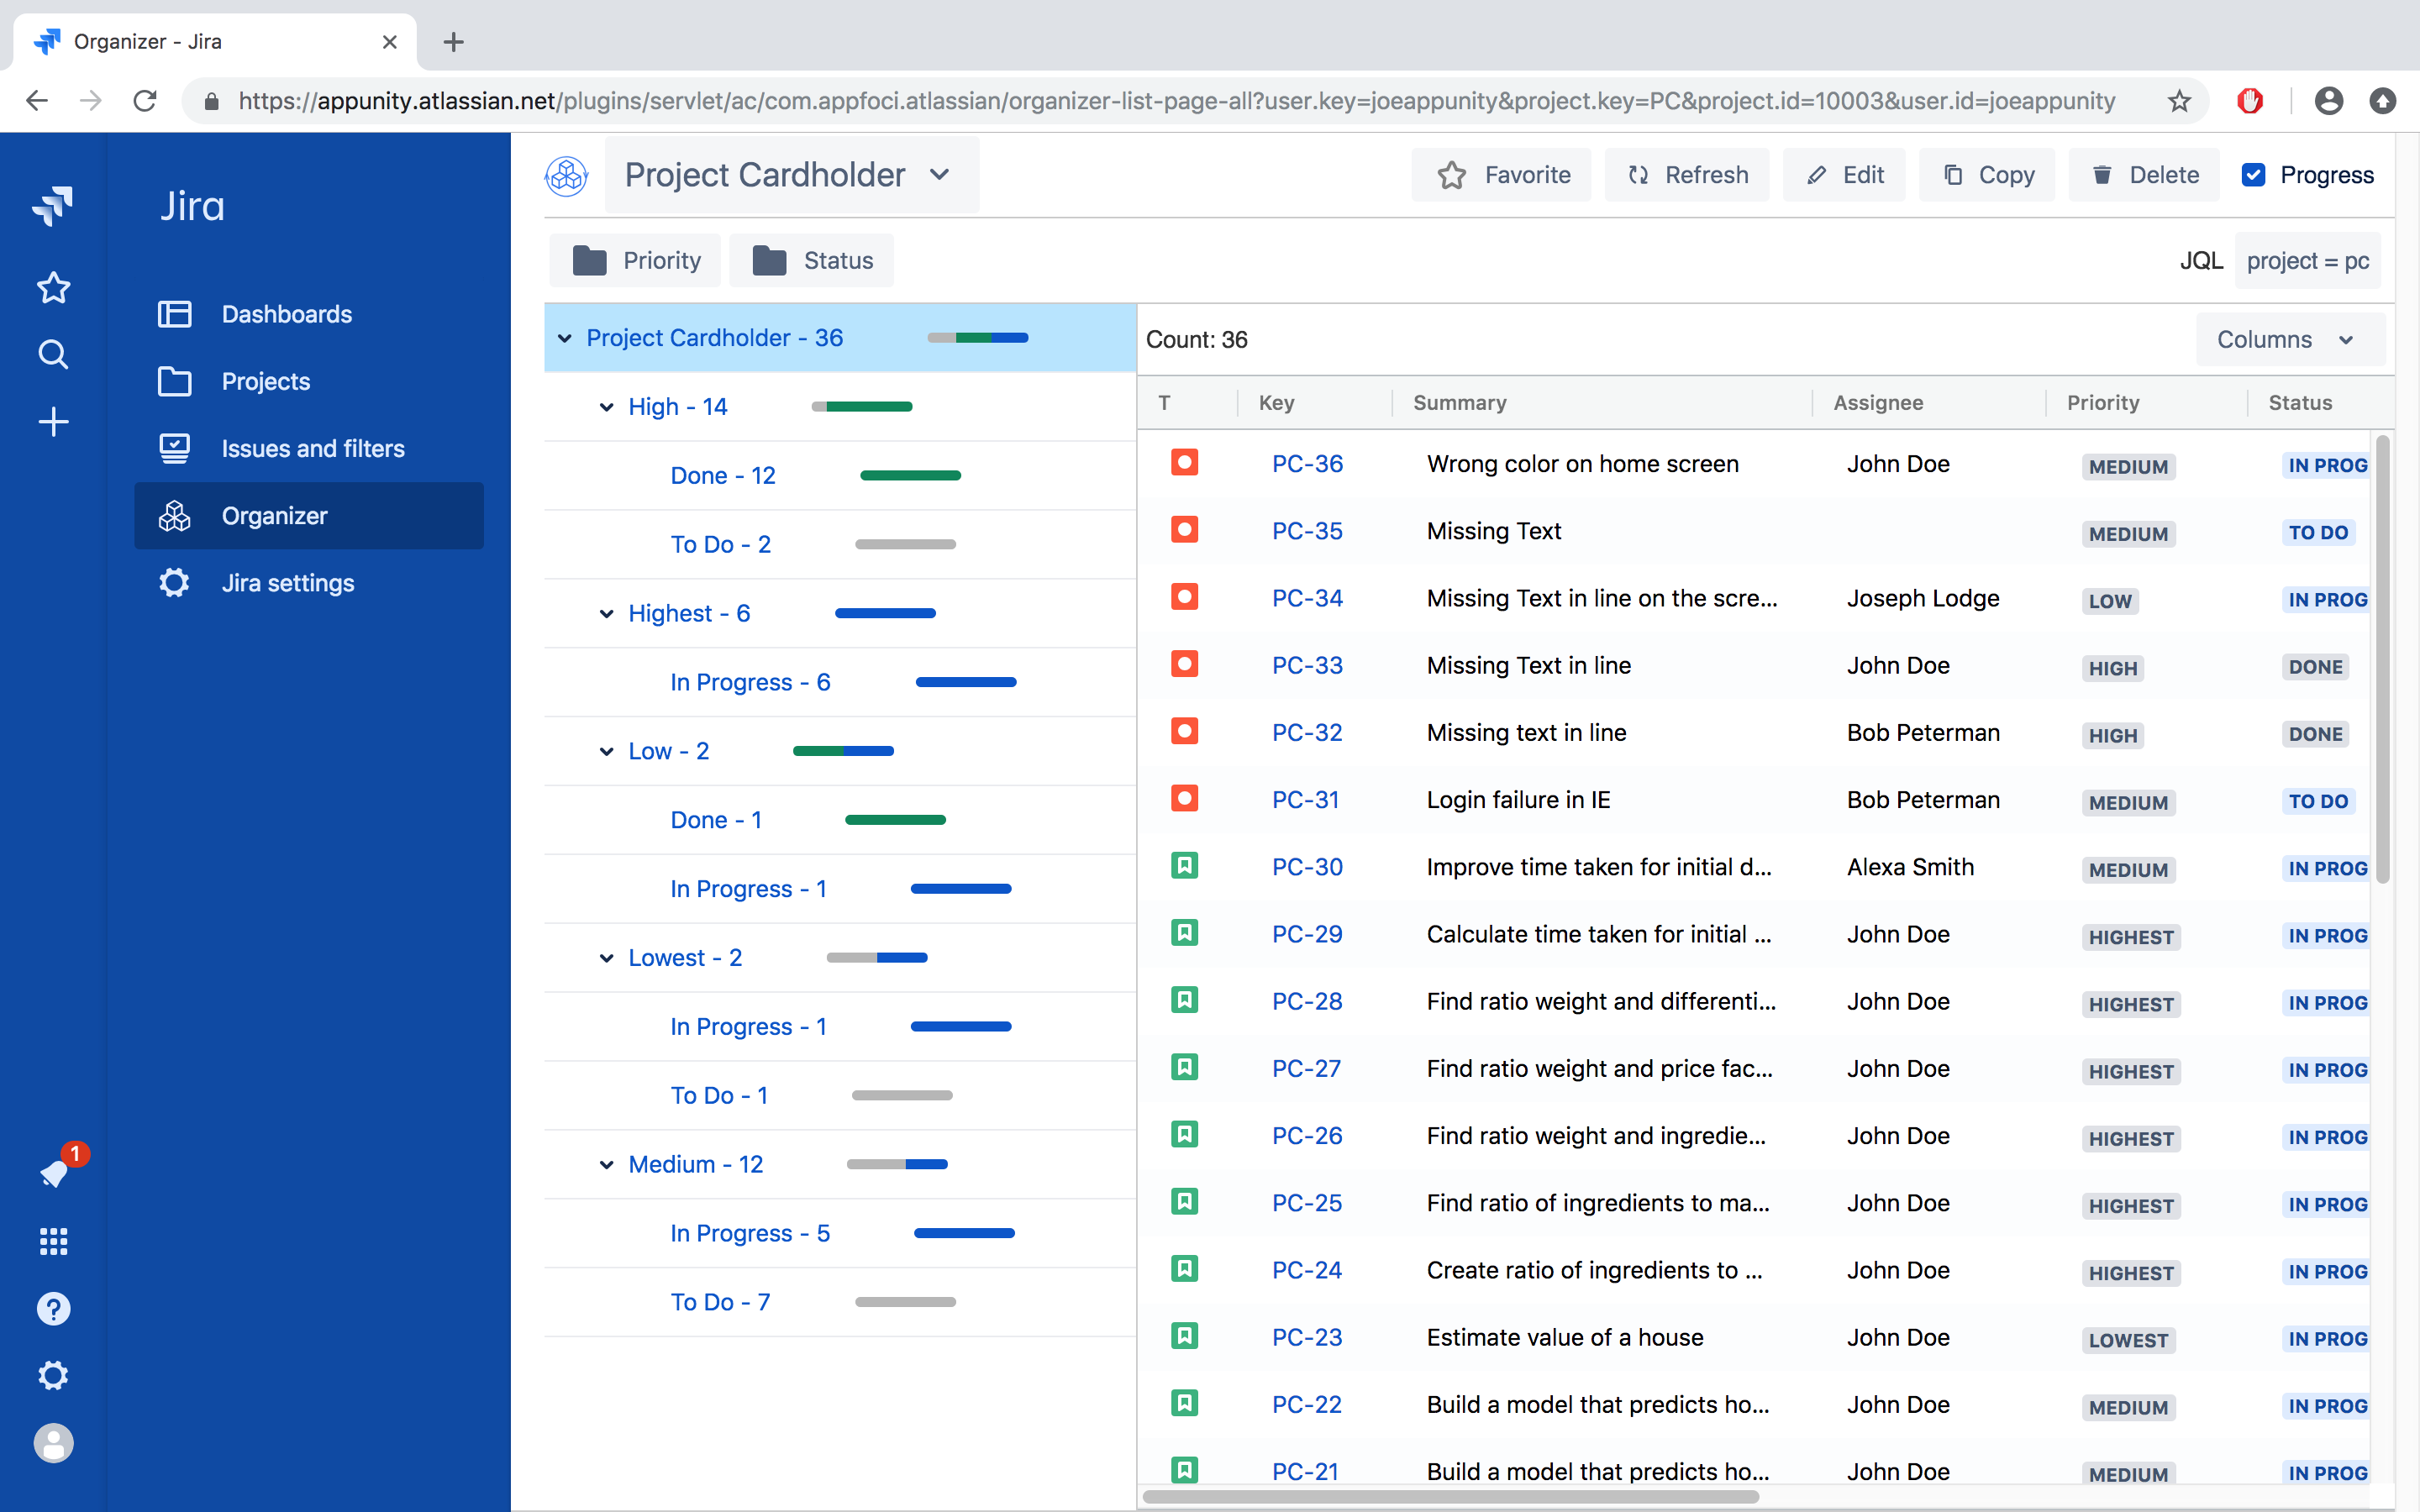
View Auto-select Organizer
- Open an Auto-select Organizer. It has an Organizer icon surrounded by a circle with arrows
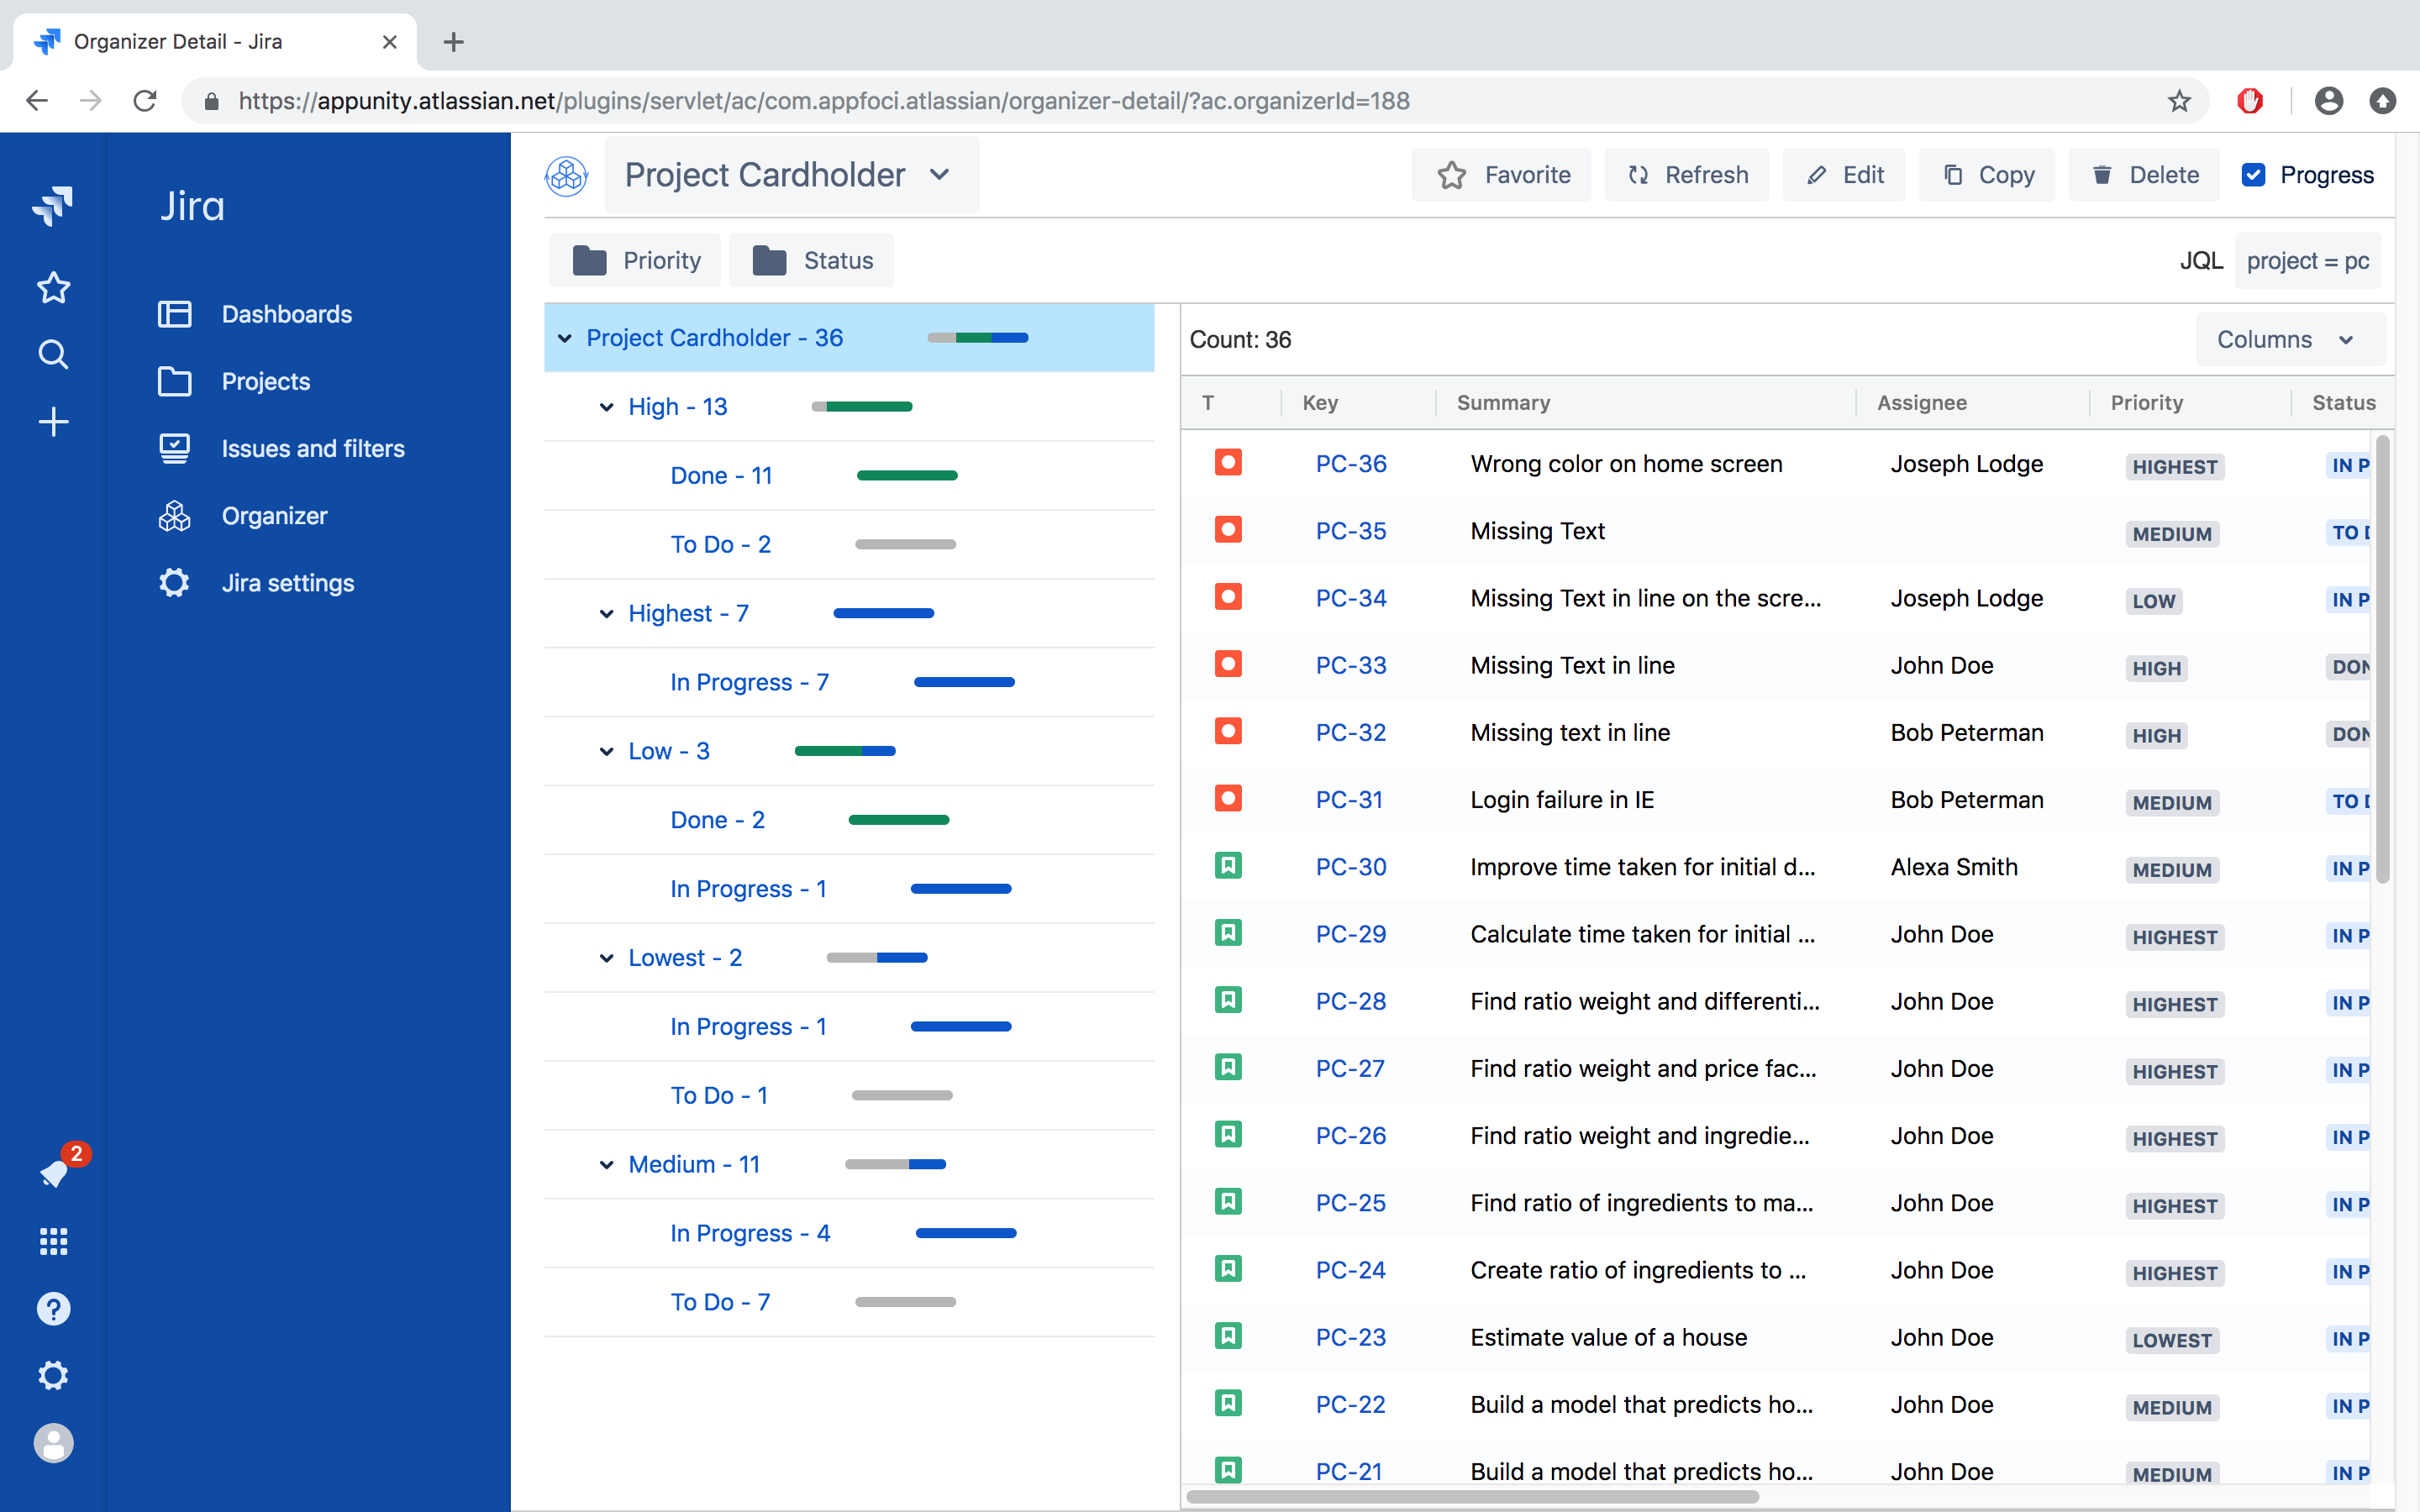
On the top of the page, toggle the "Favorite" star to mark this Organizer as one of your favorites, which will show up in MY FAVORITE section on the Organizer Dashboard
Toggle the "Progress" checkbox to show or hide the progress bars in the folder structure area
The Organizer view is synchronized with the latest data at the time of opening. If you have been in the organizer for a while, you can click the "Refresh" button to re-synchronize
If you created this Organizer, a "Delete" button is visible. Feel free to click the "Delete" Button – it will prompt to for confirmation before deleting. However, if you proceed with "Yes", the Organizer will be deleted permanently.
There are also options to Edit (if you are the creator) or Copy the Organizer. We will describe how those functions work
On the second row of the View page, click on the folder icons to show/hide the folder levels. Watch how the folder tree structure and the issue list table change. the changes are display purpose and not saved
For Auto-select Organizer, the second row also displays the JQL that defines the issues included in the Organizer
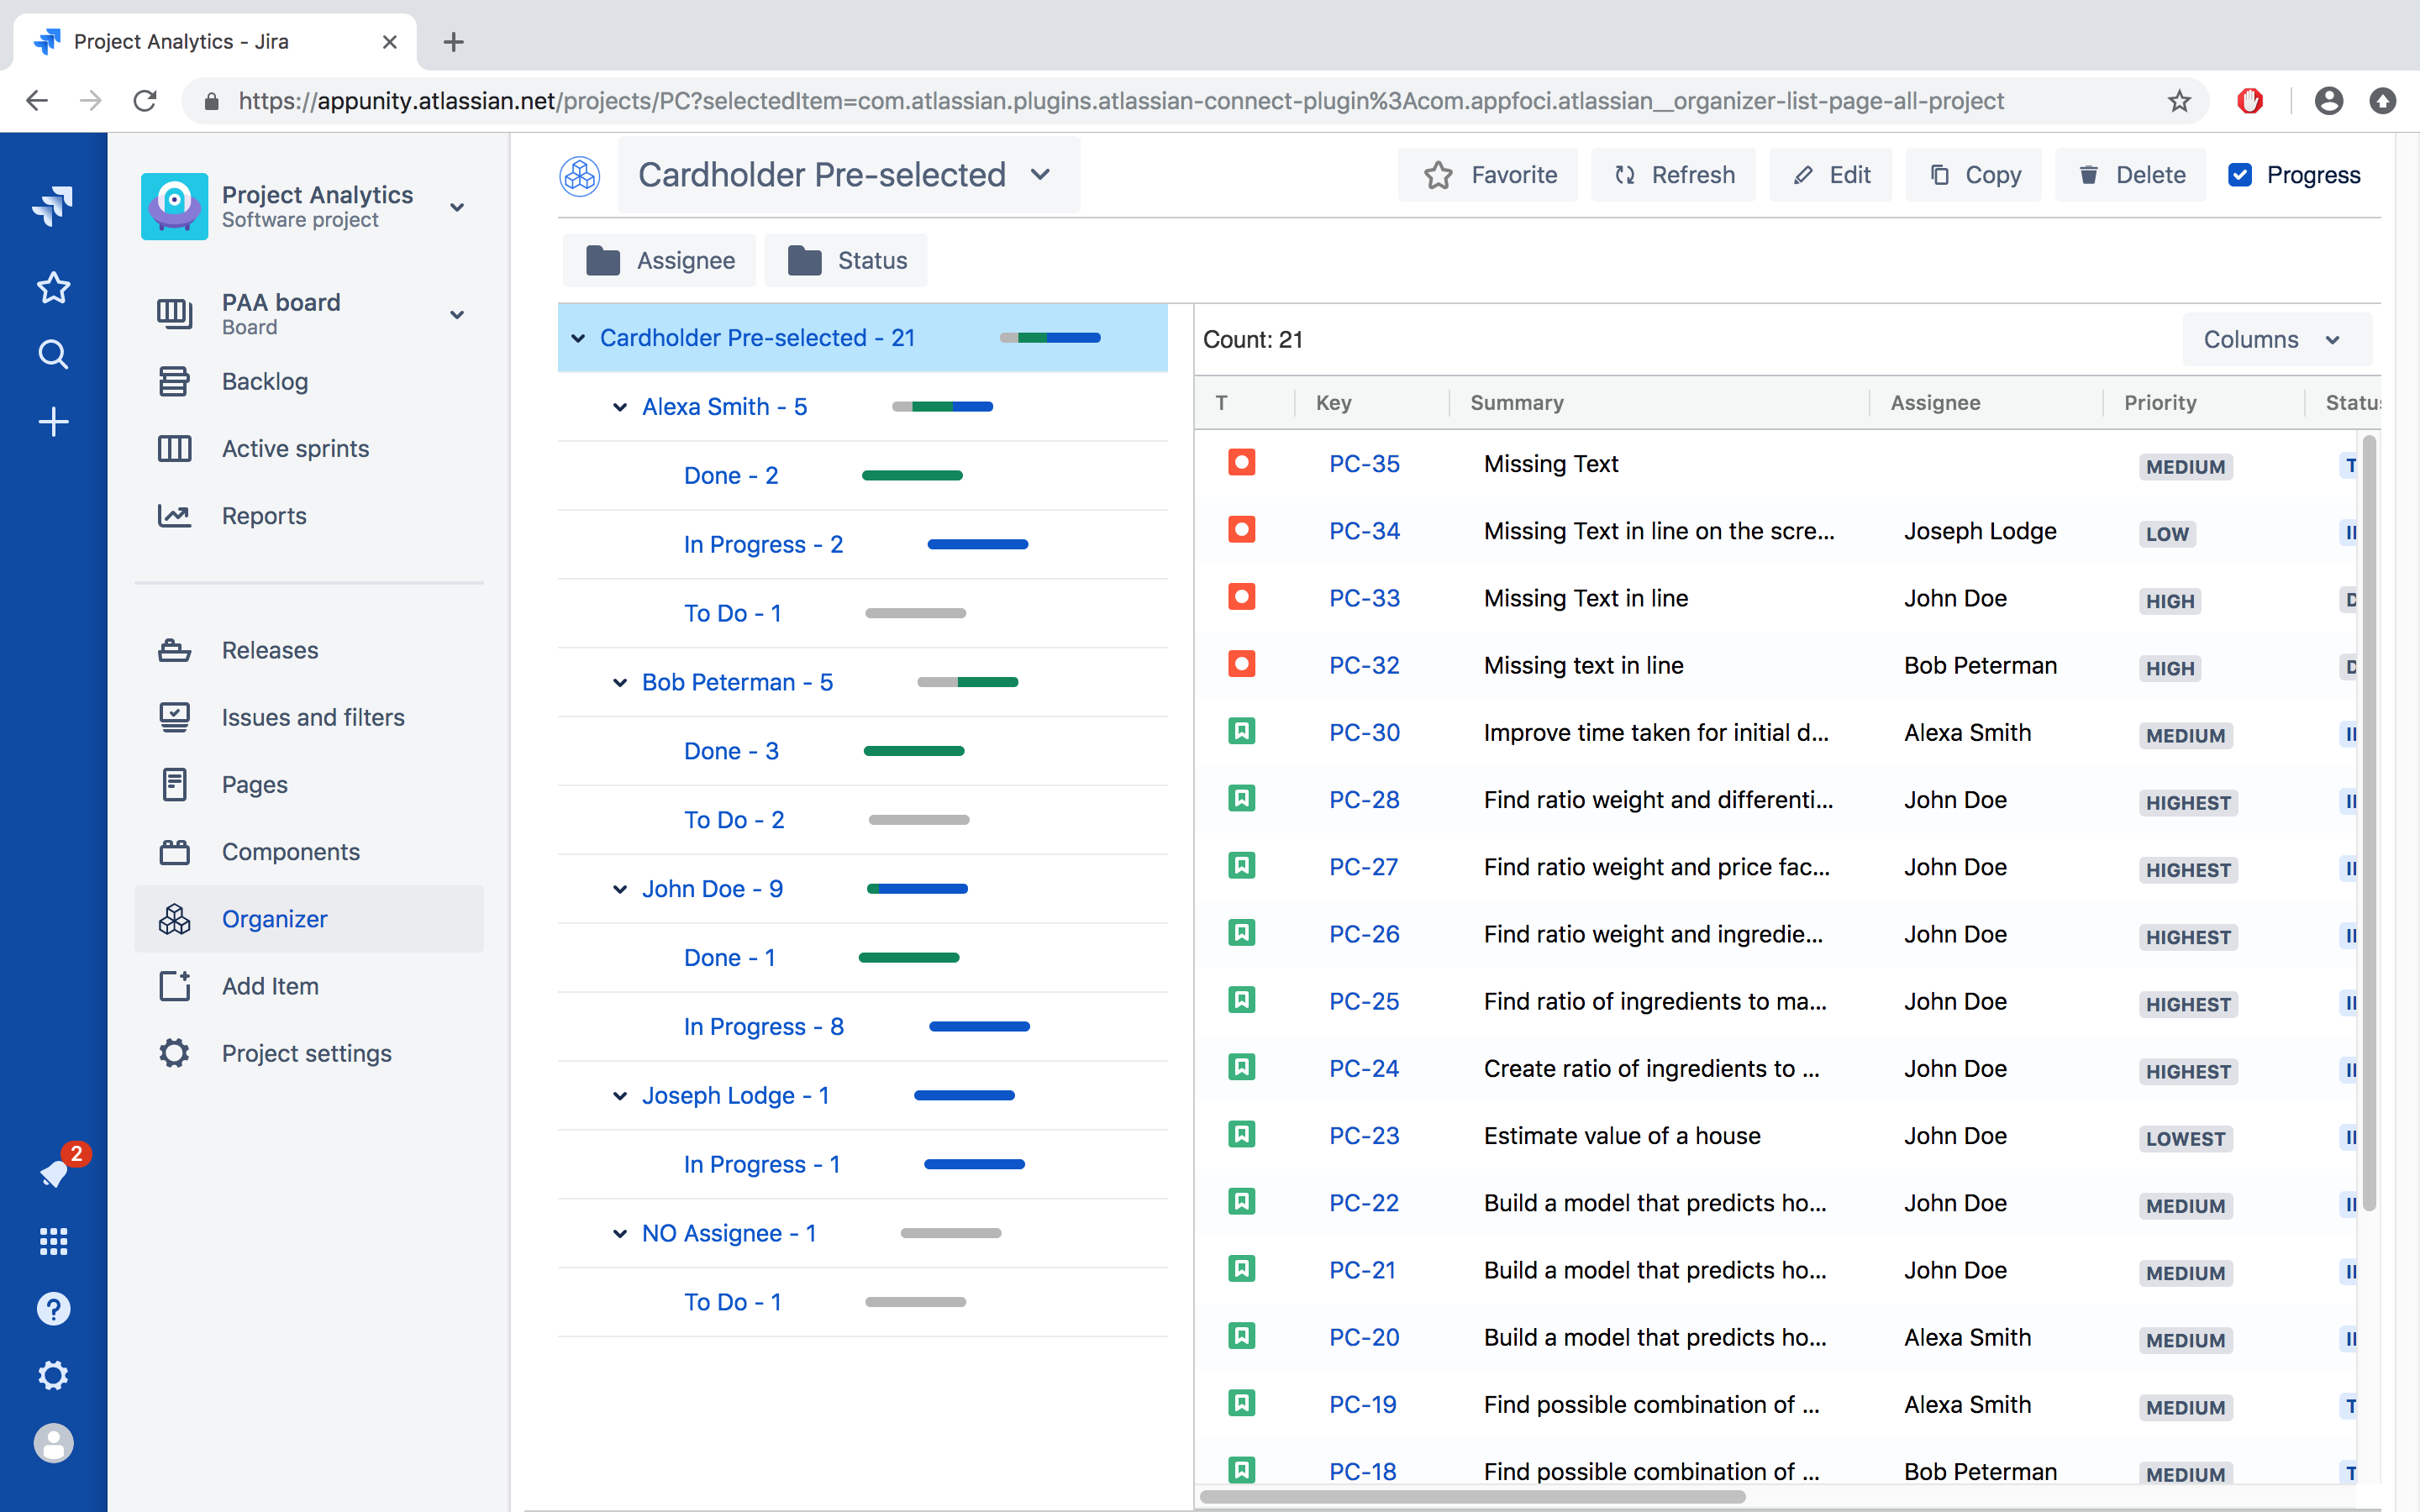
In the folder tree structure area,
Click the arrows to open or close the folders.
Click on a folder name to see the issues belong to the folder in the issue list table
The number beside a folder name indicate the total number issues within the sub-folders of that folder
The progress bar is color-coded to indicate the ration of the issues in different status. Mouse over the progress bar to see the counts and percentage of the distribution
View Pre-select Organizer
Open an Pre-select Organizer. It has an Organizer icon surrounded by a plain circle All the functions on the Pre-select Organizer View page are the same as the Auto-select Organizer, except two display differences:
The Pre-select Organizer icon circle does not have arrows
It does not have an JQL because the issues included in the Organizer are Pre-selected at the creation or editing time
Manage Jira Issues within Organizer
It is very convenient and productive to manage Jira issues in the multi-dimensional view of hierarchy folder structure.
- View an existing Organizer
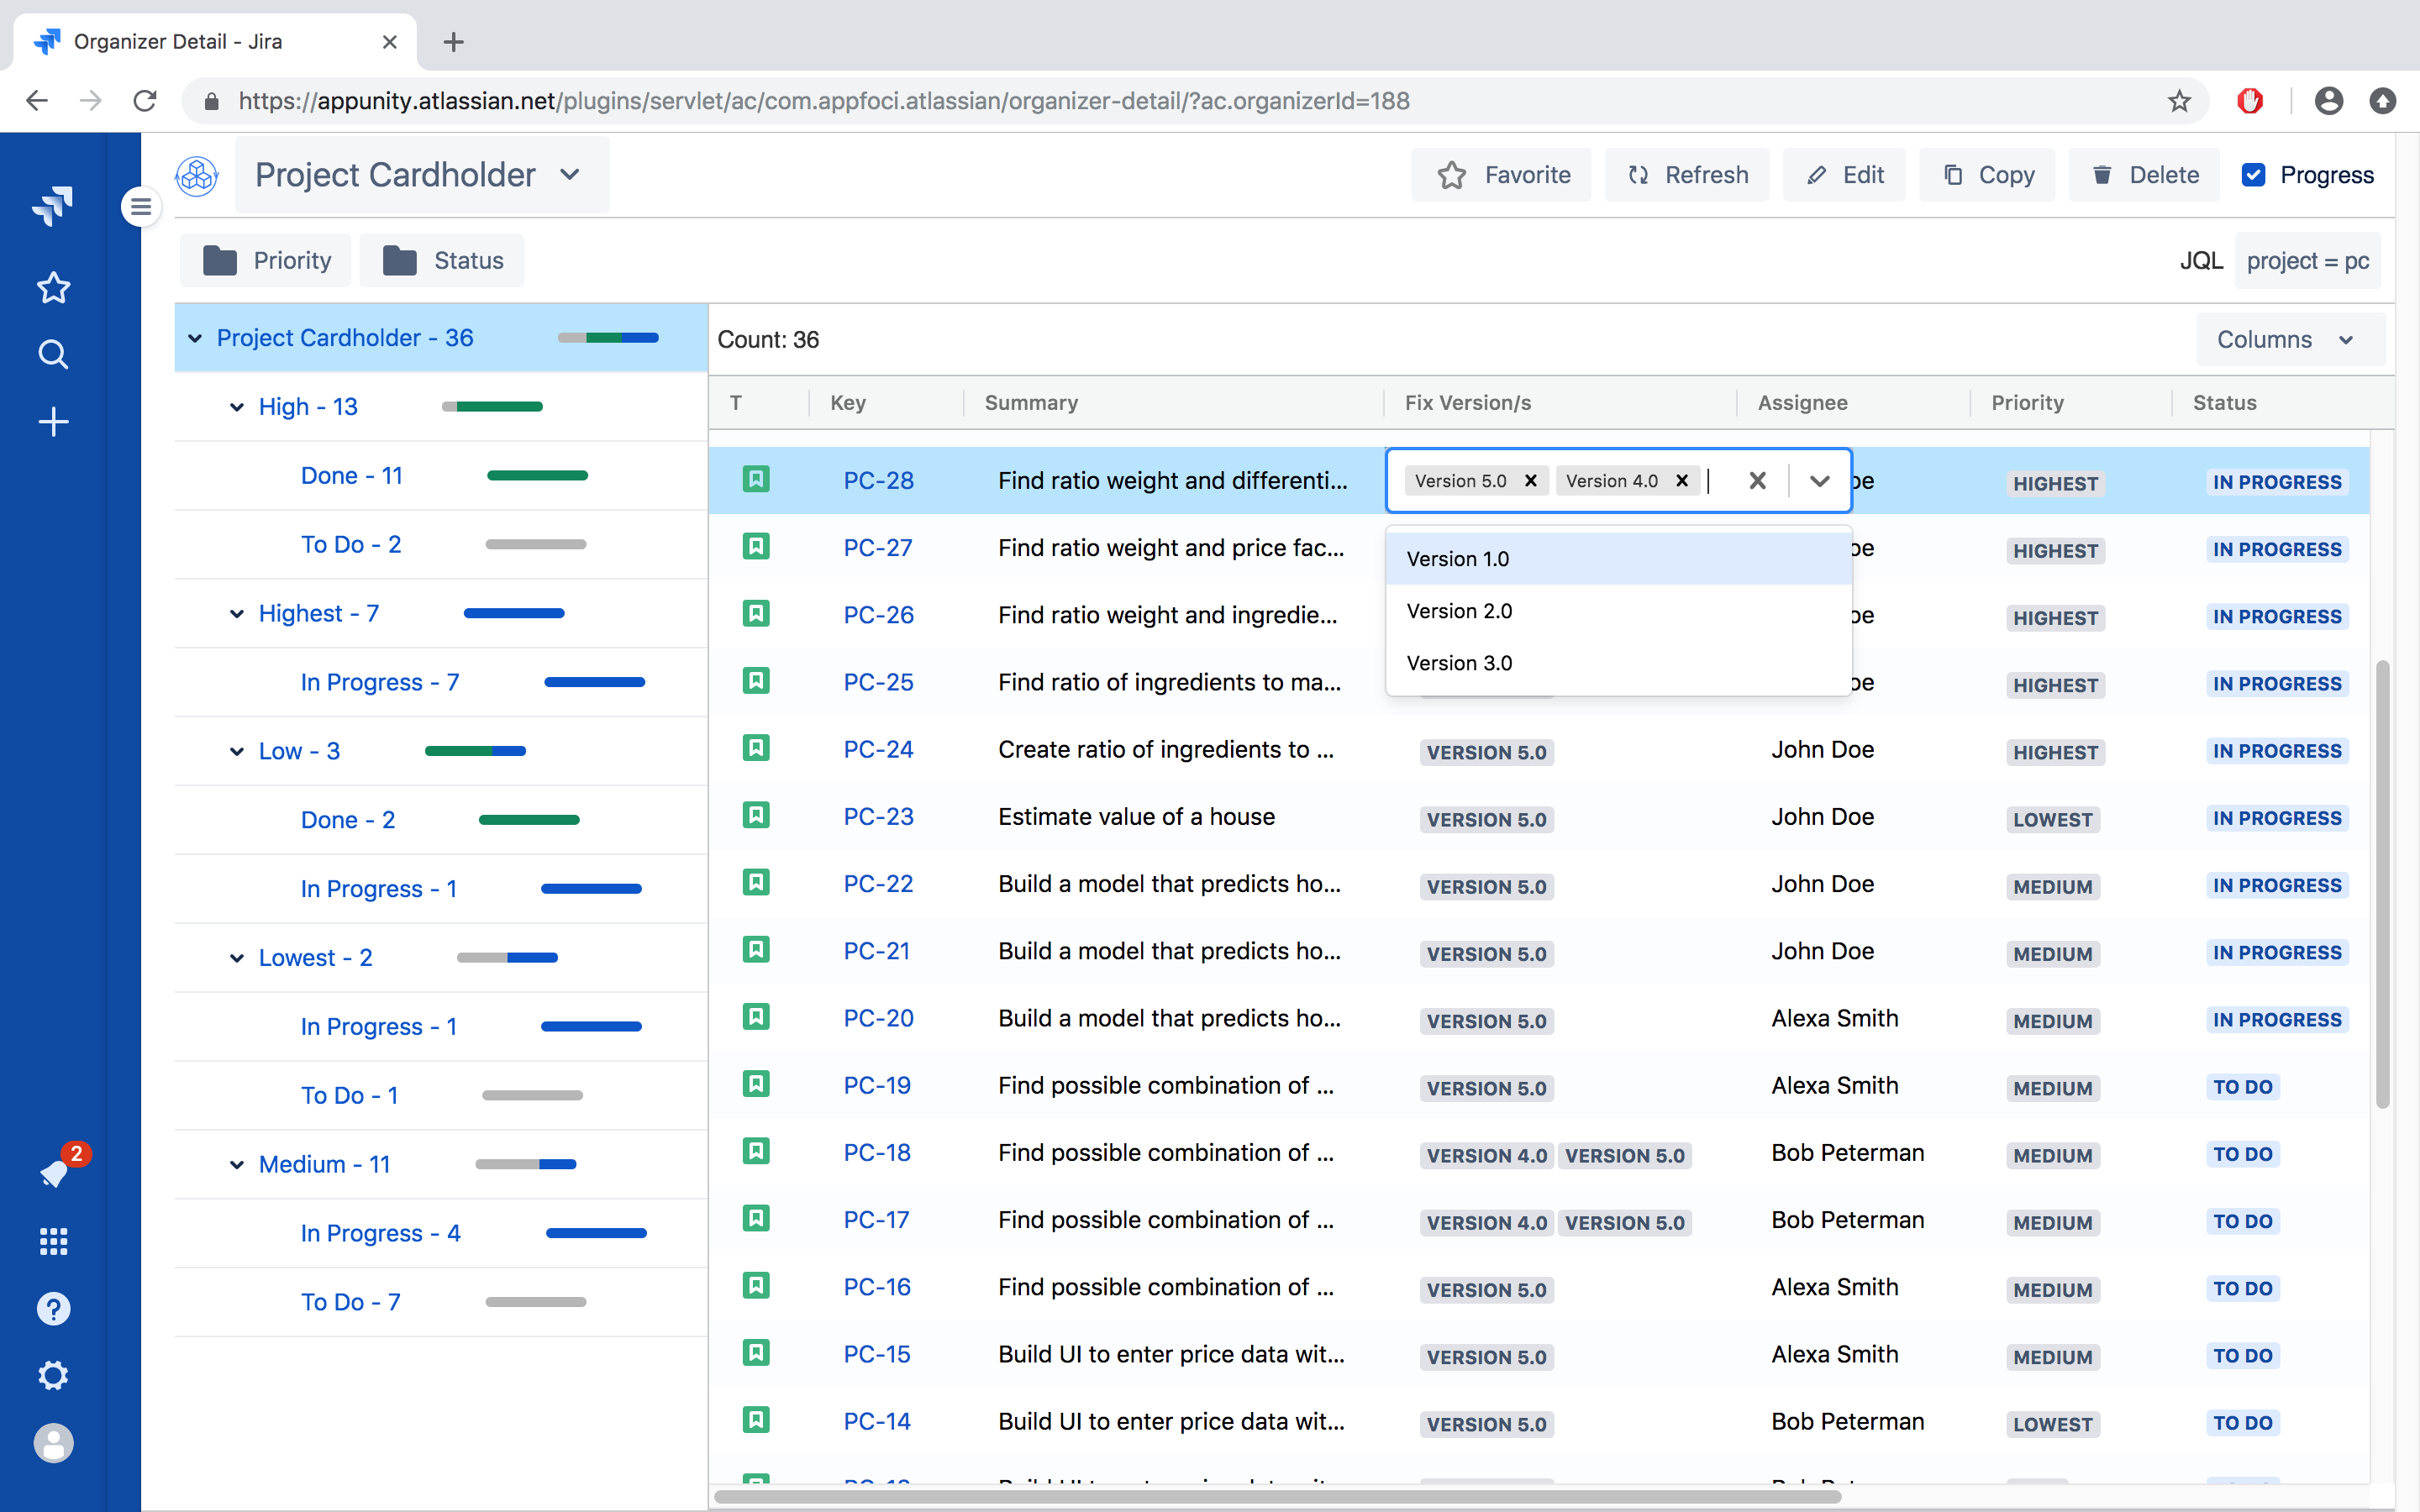
Select a folder or sub-folder to bring the issues into the table
Use the Column drop-down list to show or hide columns
Drag the column header border lines to resize the column widths
Drag-drop column headers to reorder the table columns
Click the column headers to sort the issues
Click the bread icon on the right of a column to bring up the search filed; type words to search
Clicking on the issue fields. From there, you can update the Jira issue field, including
Summary
Priority
Status
Assignee
Affected Versions
Fix Versions
Components,
Labels
Sprint
etc.
- Without leaving this View Organizer page, you can also click the "+" icon on the Jira's Left Manu Bar to create new issues. For Auto-select Organizer, if you assign the basic properties to the issue so that it falls into the Organizer, you can complete specifying the rest of the issue properties within the Organizer.
Column widths, order, and show/hide are persisted as user preferences, so that the look and feeling will be the same to you when viewing different Organizers and when you log out and log back in.
Edit Organizer
If you are the creator of an Organizer, the View page will have "Edit" button visible. click "Edit" button to bring out Edit Organizer page. It is similar to Create Organizer page. All the corresponding functions are available. Make the necessary updates and click "Save" button to save the changes. You can click "Cancel" to discard the any changes.
Copy Organizer
For Organizer View page, click "Copy" to make a copy of the Organizer. It brings you to a Create Organizer page. Except the Name has the word "COPY" appended, all the properties are copied.
Give proper Name and edit the Organizer properties. Click "Save" will create a new Organizer. You can click "Cancel" to discard the copy.
Manage Organizer
From the Organizer Dashboard, click "MANAGE ORGANIZER" to show Manage page, which lists all the Organizers created by you and those non-private ones created by other team members. To show the Organizers created by you only, check the "My Organizer Only" checkbox.
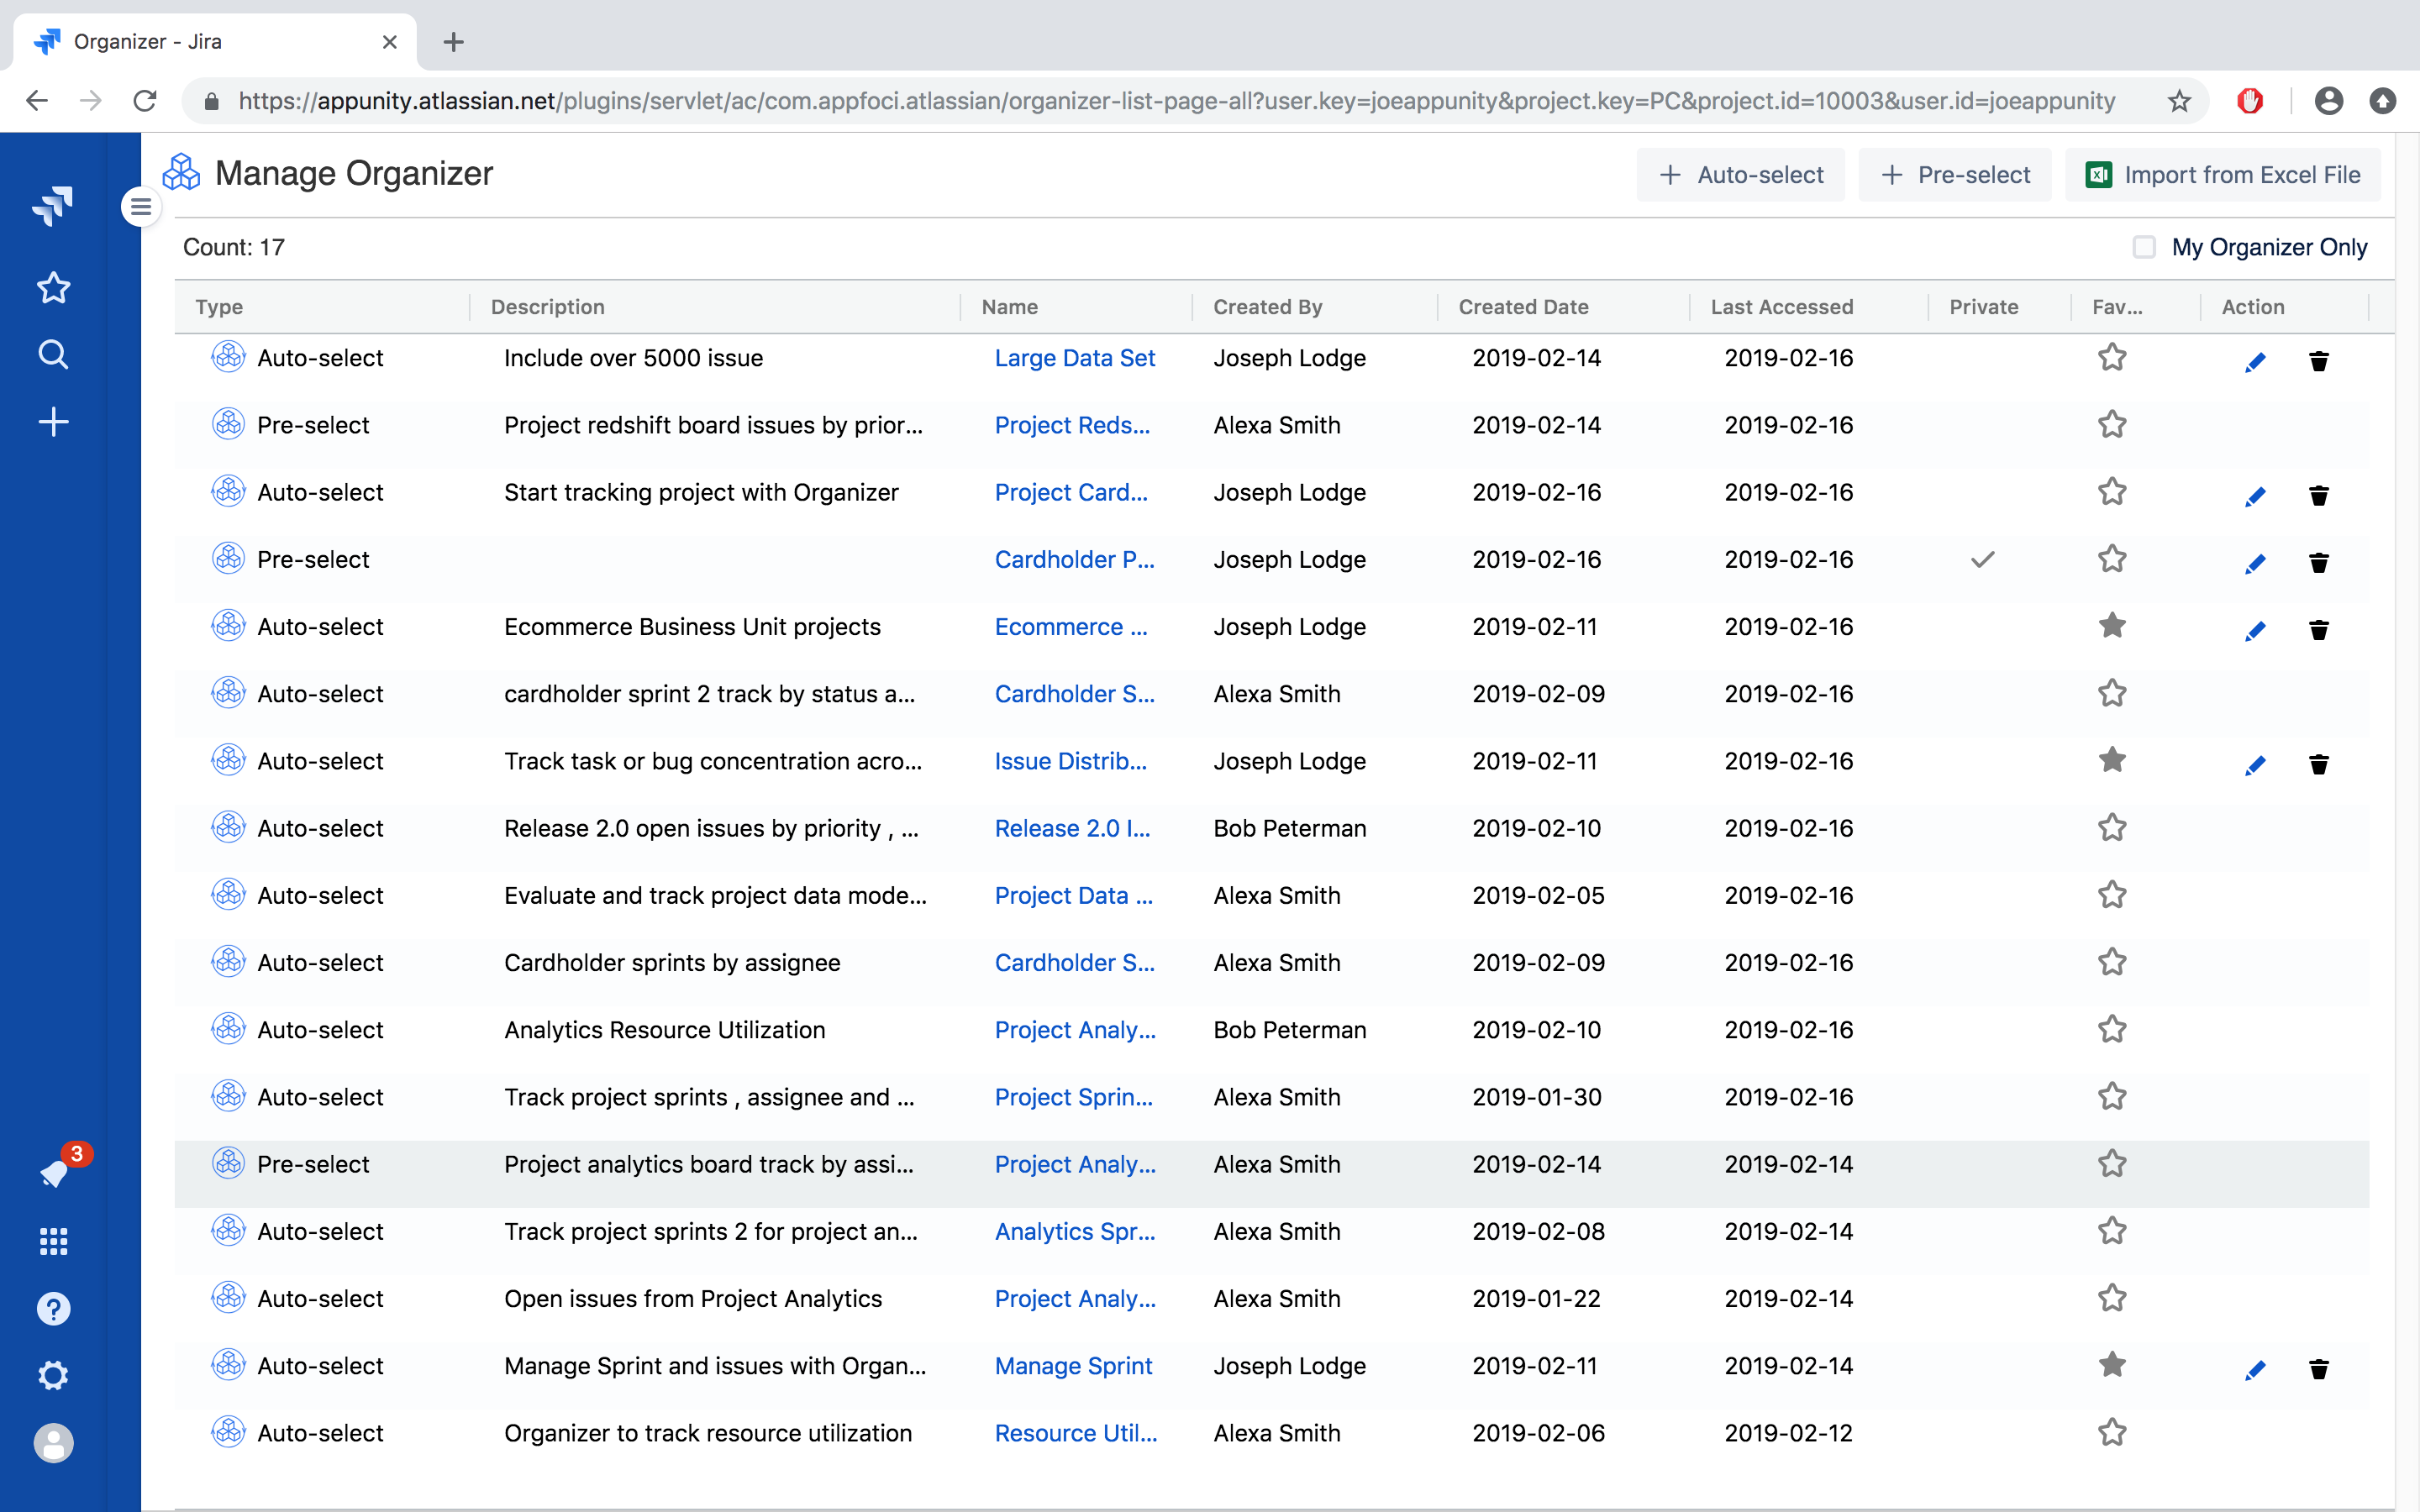
The Organizer list table is similar to the issue list table. You can reorder the columns, resize column width, sort by column, and search by column.
Click the star to mark or unmark an Organizer as favorite. For those Organizers created by you, the Action column has a Pen" icon and a Trash icon. Click the Trash icon to delete an Organizer. Click the Pen icon to edit an Organizer.
You can also start creating Auto-select Organizer of Pre-select Organizer from here.
Are you planning to migrate to or already migrated to Jira Cloud? If you happened using some other Jira Organizing tool, We provided a import function to help migrate your previous folder structure to our Organizer. Click the "Import from Excel File" button to start migrating.
...
Data Storage
Organizer for Jira stores only the meta data for the Organizer definitions, including the followings:Security
- For Auto-select Organizer: Any keywords and properties included in the JQL specifying the Organizers
- For Pre-select Organizer: The issue keys specifying the issues to be included in the Pre-select Organizers
- User account IDs to identify the organizer creators. Organizer for Jira is GDPR compliant
- The customer Jira Site URLs to seperate each customer's Organizer data from others
Web Service Hosting
The servers running Organizer for Jira app are hosted in Amazon Web Services (AWS)
Data Encryption
All the Organizer data are encrypted with encryption key securely managed